
The safest approach is simple: clear out what you can, center or cover what stays, then layer protection from the fabric up. Move small items into another room, pull large furniture toward the center, cover it with a cloth layer topped by plastic if there’s spray or dust risk, protect the floors underneath, and control dust as you go. Leave every cover in place until the final walkthrough. Full-service painters build furniture protection and cleanup directly into their packages, so homeowners hiring out this work don’t have to manage the layering themselves.
TL;DR:
- Moving blankets, canvas drop cloths, and rosin paper are the most effective protection methods for furniture, floors, and delicate surfaces during painting projects.
- Furniture should generally be pulled toward the room center or entirely removed if light enough, with heavy items handled by professionals or secured with sliders and protective layers.
- Proper layering involves fabric first, plastic second, and low-tack painter’s tape for trim to prevent moisture buildup and surface damage.
- Daily and final walkthrough checks are essential for re-securing covers and waiting for paint to fully cure before removal, minimizing dust and paint damage risks.
- Professional painters often include protection and cleanup in their packages, reducing homeowner effort and preventing costly repairs from inadequate DIY prep.
Table of Contents
- Furniture Protection During Painting: Your Step-by-Step Checklist
- Which Covers and Tape Actually Work Best?
- How Far Should You Move Furniture Before Painting?
- How Do You Protect Delicate Finishes and Electronics?
- What’s the Best Way to Protect Floors From Paint?
- When Should You Remove Furniture Covers?
- How Do You Contain Dust From Sanding and Repairs?
- What Should You Expect From a Professional Painting Service?
- Weighing Protection, Convenience, and Cost
- Get Furniture Protection Handled for You
- Sources
- FAQ
Furniture Protection During Painting: Your Step-by-Step Checklist
A little sequencing saves hours of cleanup later. Work through these steps before anyone opens a paint can:
- Remove loose items first — books, lamps, décor, and anything on shelves goes into boxes or another room.
- Relocate small furniture entirely if there’s space elsewhere in the home.
- Center large furniture in the room, away from walls and windows, if it can’t be moved out.
- Clear walking paths so painters (or you) aren’t stepping over cords or corners.
- Unplug and shield electronics, covering vents and ports before draping anything over them.
- Cover and secure remaining pieces with layered fabric and plastic.
- Protect the floor under and around every covered item.
- Do a daily check at the end of each work session and a final check before removing anything.
Confirm during the walkthrough who handles what. Reputable interior painting checklists treat furniture moving as a shared task: homeowners handle personal and fragile items, painters handle heavier lifting and covering. Leave covers on until paint is fully cured, not just dry to the touch, and keep floor protection down overnight if the job spans multiple days.
Which Covers and Tape Actually Work Best?
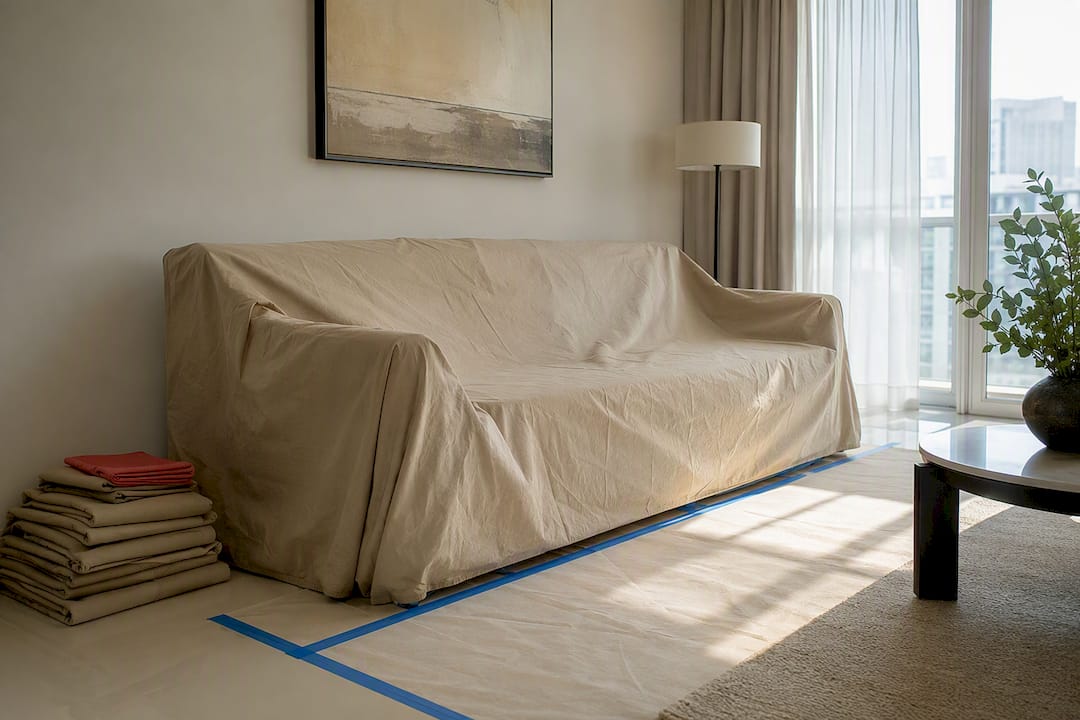
Not every cover does the same job, and picking the wrong one causes its own problems. Canvas drop cloths are absorbent, grip the floor better than plastic, and hold up over multiple days of work, which is why many professional painters treat them as the default choice for indoor furniture protection. Thin plastic sheeting adds a dust and overspray barrier but gets slippery underfoot and traps moisture if left on wood or leather too long. Heavy-duty plastic is worth the extra cost for spray work. Rosin paper (builder’s paper) is the standard for floors because it’s inexpensive, tears predictably, and doesn’t slide the way plastic does. Moving blankets add padding for corners and edges during transport.
- Layer cloth first, plastic second, especially over wood, leather, or upholstery. This traps far less condensation than plastic alone.
- Use low-tack painter’s tape on trim and baseboards, never directly on finished wood or leather.
- Size covers generously. A cloth that’s too small shifts and exposes edges.
- Wear gloves and a mask for sanding or heavy dust work.
Pro Tip: A reusable canvas drop cloth sized for a sofa (roughly 6 by 9 feet) works well for spills, but canvas isn’t waterproof. If you’re worried about a large liquid spill near upholstery, add a thin plastic layer on top rather than relying on canvas alone.
How Far Should You Move Furniture Before Painting?
Anything light enough to carry should leave the room entirely. Everything else gets pulled toward the center, at least three to four feet from the walls being painted, so brushes and rollers never come close to contact. That clearance also gives painters room to work without bumping into edges or knocking things over.
- Use furniture sliders or a dolly for heavy pieces instead of dragging them across the floor.
- Lay down rosin paper or a moving blanket as a path before sliding anything heavy.
- Check building rules ahead of time if you’re moving furniture through shared corridors or a service elevator.
- Photograph the room before work starts, in case anything needs documenting later.
Heavy antiques, built-ins, and pianos are where professional help earns its keep. Some contractors handle furniture moving as part of the job; others expect homeowners to clear the room first, so confirm this during the walkthrough rather than assuming.
How Do You Protect Delicate Finishes and Electronics?
Fabric first, plastic second, is the rule that saves finishes. Plastic alone traps humidity against polished wood, leather, and marble, and that trapped moisture can cause clouding or discoloration over a multi-day job. A cloth layer breathes and absorbs incidental contact, while plastic on top handles dust and overspray without sealing in condensation.
- Remove framed art and mirrors from walls entirely rather than covering them in place.
- Wrap antique furniture corners with padding before adding any outer cover.
- Cover electronics loosely, leaving vents and cord openings uncovered until you’re actually painting nearby.
- Skip aggressive tape on anything with a fragile or refinished surface.
High-value or historically significant pieces are worth handling separately. Professional guidance consistently recommends avoiding tape near recently refinished floors or antiques in favor of fabric barriers and, when the piece is valuable enough, professional handling instead of DIY wrapping.
What’s the Best Way to Protect Floors From Paint?
Floors take more abuse than furniture during a paint job, since every drip, footstep, and dragged drop cloth ends up there. Canvas works well for general foot traffic because it grips and absorbs. Rosin paper is the standard for hardwood and tile since it’s cheap enough to replace mid-job and doesn’t create a slip hazard. Self-adhesive carpet film suits, unsurprisingly, carpeted areas where you need dust containment without soaking into fibers.
- Tape floor coverings only at the edges, using painter’s tape rated for the flooring type.
- Skip tape entirely on finished hardwood if you’re unsure about the adhesive; weight the overlap with furniture or heavy objects instead.
- Add extra coverage at stairs and thresholds, where foot traffic concentrates.
- Check transition strips daily. They’re where covers most often bunch up and create a trip hazard.
Pro Tip: Poor floor protection doesn’t just risk the floor. A shifted or slipping cover tracks paint right back onto furniture you already protected, so check floor coverings as often as you check the furniture itself.
When Should You Remove Furniture Covers?
Sealing covers correctly matters as much as choosing the right material. Use low-tack painter’s tape for anything touching trim, baseboards, or floor edges, and never apply tape directly to finished wood or leather surfaces. For longer jobs, stretch wrap or a moving blanket cinched with tape gives you a sealed layer that survives several days without shifting.
- Re-secure loose edges at the end of every work session, not just once at the start.
- Wait for paint to fully cure, not just surface dry, before removing anything. This typically takes longer than the recoat window on the can.
- Peel tape at a 45 degree angle, pulling slowly to avoid lifting finish underneath.
- Fold covers inward as you remove them, so dust and paint flakes stay contained instead of scattering.
- Do a final walkthrough, checking corners and vents before considering the cleanup complete.
How Do You Contain Dust From Sanding and Repairs?
Sanding and hole patching create fine dust that travels far faster than most homeowners expect, especially in smaller rooms or apartments where air moves between spaces quickly. Sealing doorways with plastic sheeting, covering HVAC vents, and setting up temporary barriers keeps dust from migrating into rooms you’ve already protected.
- Use a HEPA-filter vacuum or dustless sanding equipment for larger repair jobs instead of dry sanding.
- Turn off forced-air HVAC during sanding. Running it circulates dust into every connected room.
- Set up negative-pressure containment for heavy sanding work, particularly in multi-day renovations.
- Treat older homes with suspected lead paint as a job for a certified abatement specialist, not a DIY sanding project.
Pro Tip: If you’re tackling dustless sanding on walls yourself, seal the room first and check adjoining spaces for dust migration before you start. It travels faster than you’d think, especially through HVAC returns.
What Should You Expect From a Professional Painting Service?
A full-service provider like 5starpainting builds furniture protection, surface prep, and cleanup into its packages, along with a dedicated project manager assigned to the job and a one-year warranty, all under one all-inclusive price with no hidden fees, according to the company. That kind of coverage removes the guesswork of matching materials to surfaces yourself.
At the walkthrough, ask exactly what gets covered, what gets moved, and who handles daily securing between sessions. Fabian’s homeowner checklists consistently point to the same decision line: DIY protection works fine for a single room with modest furniture, but heavy antiques, delicate finishes, or multi-day jobs are where hiring a pro pays for itself in avoided repair costs.
Weighing Protection, Convenience, and Cost
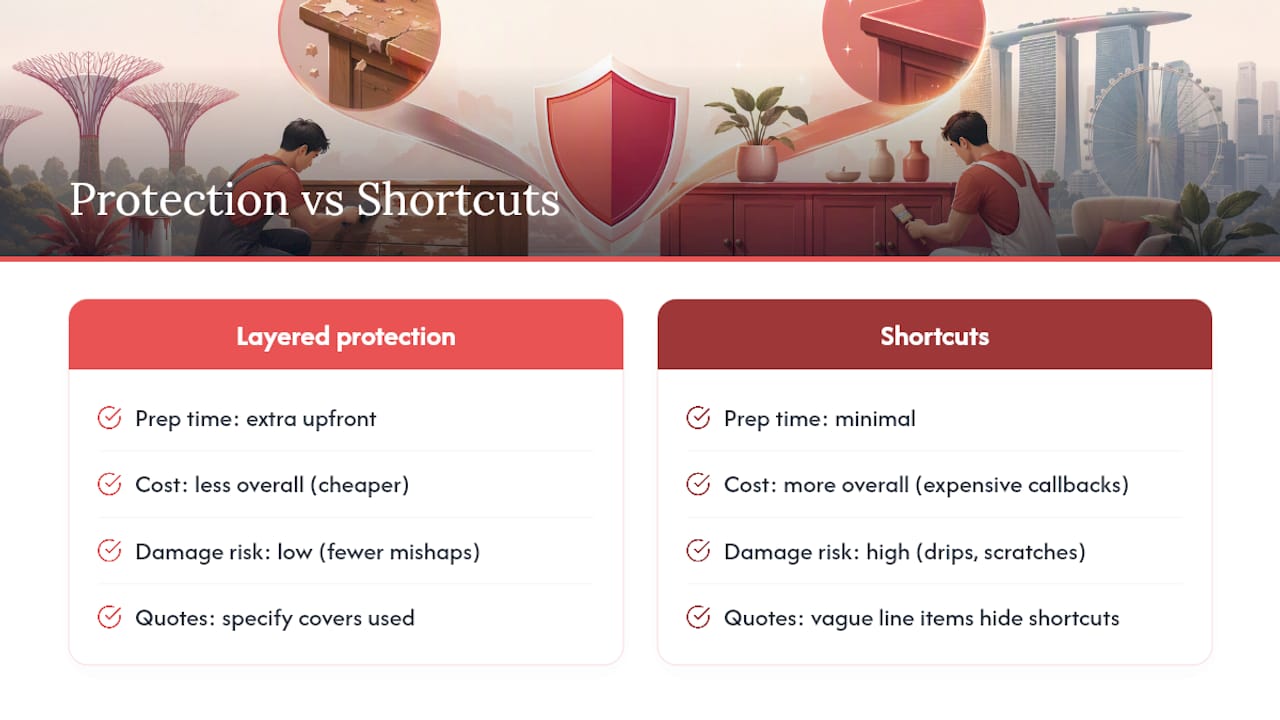
Extra prep time upfront almost always costs less than fixing a paint drip on a leather sofa or a scratched hardwood floor. Professionals build in layered protection because callbacks for damage are far more expensive than an hour of covering furniture properly.
If you’re getting quotes, ask specifically what covers are used on upholstery and floors, not just whether “furniture protection” is included. Vague line items hide a lot of shortcuts.
— Fabian
Get Furniture Protection Handled for You
Layering cloth and plastic, moving furniture to the center of the room, and taping edges correctly takes real time, and most homeowners underestimate how much of it disappears into prep before a single wall gets a coat of paint. Some professional painting services build furniture protection, genuine paint application, and full cleanup into their package prices, often assigning a dedicated project manager to oversee the job so homeowners aren’t the ones checking floor edges at the end of each day.

HDB flat owners can review the HDB painting packages, which range from the Basic to Premium tiers, and condo owners can check the condo painting packages for comparable coverage. Both include protection and cleanup as part of the quoted price, not as an add-on. Book a walkthrough to get a fixed quote and confirm exactly which furniture and floor protection methods apply to your space before work begins.
Sources
- How to Protect Your Furniture During a Painting Project: Tips and Tricks — Painters Solutions
- Canvas Drop Cloth for Couch Protection – 6 × 9 ft, 2 Pack – Cushion Palace
FAQ
What Can I Use to Protect My Furniture While Painting?
Canvas drop cloths topped with plastic sheeting for dust or spray work is the combination most professional painters rely on. Moving blankets add padding for corners and edges, while rosin paper handles the floor underneath.
What Should I Put on Painted Furniture to Protect It?
A cured coat of paint doesn’t need a special topcoat in most cases, but a clear polyurethane or wax finish adds extra durability if the piece sees heavy daily use. Wait until the paint has fully cured, not just surface dry, before applying any protective coat.
What Should I Cover Furniture With When Painting?
Fabric first, plastic second, is the safest layering order because it prevents condensation from building up against wood or leather. Rosin paper covers the floor separately and shouldn’t double as furniture protection.
Do I Need a Top Coat When Painting Furniture?
Not always. A top coat is optional for most interior paint jobs, but it’s worth adding on high-traffic furniture like tables and cabinet doors where daily wear is a concern. Companies like Some professional painters use genuine Nippon Paint formulated for durability, which can reduce the need for a separate protective coat on walls and trim.