
Wall prep is the cleaning-and-repair work that keeps paint from broadcasting every flaw on your surface, and it follows a fixed order: clear the room, scrape and repair, sand, clean, tape and protect, then prime. A room in decent shape takes about 2 to 4 hours from start to finish, using materials as basic as filler, sandpaper, and a name-brand primer like Nippon Paint. Skip a step and you’ll see it later, usually right through the topcoat.
TL;DR:
- Proper wall preparation requires careful cleaning, repairing, sanding, taping, priming, and verifying, which collectively consume the majority of the project time and determine the final quality.
- Using the correct filler for different damage types, fully drying between layers, and properly sanding patched areas are critical to prevent defects like cracking or visible patches years later.
- Prime only over bare drywall, stains, or major repairs, and always test primer adhesion to ensure proper bonding before topcoating.
- Drying times vary, with lightweight filler drying in under an hour and heavier repairs possibly taking overnight; environmental conditions significantly influence these durations.
- For large repairs, structural cracks, or water damage, hiring a professional ensures proper diagnosis, repair, and compliance with safety standards, preventing costly mistakes.
Table of Contents
- What Do You Need for Wall Prep?
- How Do You Prep Walls for Painting Step by Step?
- How Long Does Wall Prep Take?
- Should You DIY or Hire a Painting Professional?
- What Mistakes Ruin a DIY Paint Job?
- Who’s Behind This Guide?
- Why Most Wall Prep Advice Undersells the Repair Step
- Get Professional Wall Prep and Painting Without the Weekend Project
- Sources
What Do You Need for Wall Prep?
Gather everything before you start, since a mid-project hardware run kills momentum and dries out open filler.
For cleaning, keep sugar soap or a mild detergent on hand. Selleys Sugar Soap Liquid is a widely available option that cuts through dust and light grime without leaving residue behind. Kitchens and bathrooms need something stronger, so add a degreaser or a TSP-style cleaner for grease buildup, plus a bleach solution for any mildew spots.
For repairs, stock a multi-purpose filler for small holes, a setting compound for wider cracks, and a paintable caulk. Selleys No More Gaps works well for sealing gaps along trim and corners before you paint over them.
Round out the kit with these essentials:
- Sandpaper in 120 to 150 grit for repairs, 220 grit for final smoothing
- A sanding block or pole sander for ceilings and tall walls
- Painter’s tape, drop cloths, and a putty knife or scraper
- A screwdriver for removing outlet covers and switch plates
- Primer suited to your wall condition (more on choosing one below)
- Gloves, goggles, and a dust mask or respirator for sanding and solvent work
How Do You Prep Walls for Painting Step by Step?
This is the sequence that determines whether your paint job looks professional or amateur. Follow it in order. Skipping ahead is where most DIY projects go wrong.
-
Clear and protect the room. Move furniture out or push it to the center and cover it. Remove outlet covers and switch plates, and label small screws in a cup so you don’t hunt for them later. Lay drop cloths over flooring and baseboards.
-
Scrape off loose paint or wallpaper. Run a putty knife or scraper under any peeling edges, working outward until the material stops flaking. Feather the edges of remaining paint with sandpaper so the transition to bare wall isn’t a visible ridge once you prime.
-
Fill holes and cracks according to size. Nail holes and small dings take standard spackle. Wider cracks and gouges need a setting compound, applied in thin layers rather than one thick pass, since thick fills crack as they cure. For cracks wider than a hairline, embed fiberglass mesh tape in the first layer before adding compound on top. Let each layer dry fully. Rushing this step is one of the most common reasons patches show through paint months later.
-
Sand everything smooth. Once filler is dry, sand patched areas with 120 to 150 grit paper first, then switch to 220 grit for a final smoothing pass. Use long, even strokes with a sanding block on flat walls, and a pole sander for ceilings so you’re not balancing on a ladder while pressing hard. Wipe away dust between passes with a slightly damp cloth. If your walls have a glossy finish, sand them dull across the whole surface, not just the repaired spots, so new paint actually bonds.
-
Clean the entire surface. Sugar soap or a mild detergent handles everyday dust and fingerprints. Kitchen walls near cooking areas usually need a degreaser first. If you spot mildew, mix a bleach solution at roughly 3 to 4 parts water to 1 part bleach, scrub it in, then rinse thoroughly. Wear gloves and goggles and open a window while you work with bleach. Let the wall dry completely before moving to the next step. Painting over even slightly damp walls traps moisture behind the film and invites peeling.
-
Caulk gaps at trim and corners. Run a bead of paintable caulk anywhere walls meet baseboards, window casings, or crown molding. Smooth it with a wet finger or a caulk tool before it skins over. Most caulks are paintable within an hour, but check the tube since formulas vary.
-
Tape and cover what you’re not painting. Press painter’s tape firmly along trim edges, using a putty knife to seat it into corners so paint can’t creep underneath.
-
Prime where it counts. You don’t need to prime every wall every time, but you do need it over bare drywall, patched areas, stains, or when you’re making a drastic color change. Choose the right primer for the situation: a PVA primer for new drywall, a shellac-based primer for stubborn stains or water damage, and a bonding primer for glossy or slick surfaces that regular paint won’t grip.
-
Verify before you paint. Run your fingernail across patched areas. If you catch on anything, sand again. Wipe a damp cloth over the surface. If it comes away dusty, clean once more. These few extra minutes are cheaper than repainting a wall that flakes in six months.
Pro Tip: Test primer adhesion on a small patched area by pressing a strip of tape onto it once dry, then peeling it back. If primer lifts off with the tape, it hasn’t cured or bonded properly, and you need to wait longer or reapply before topcoating.
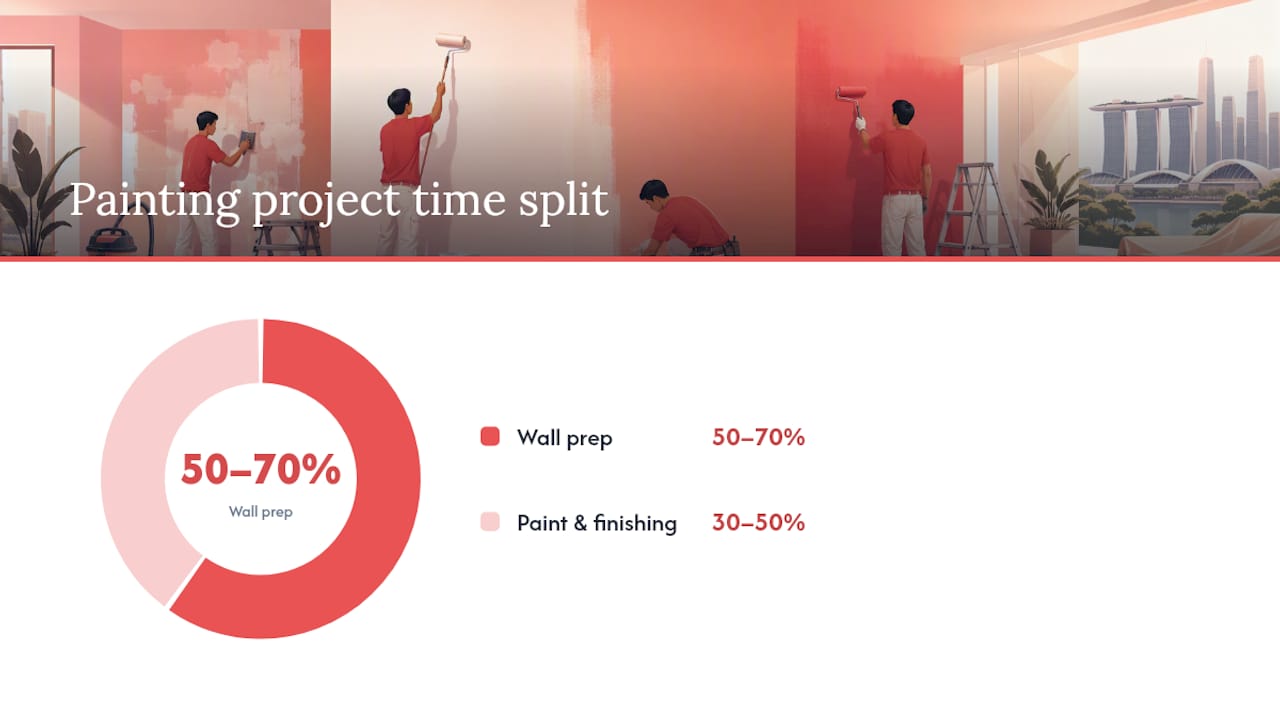
Professional crews back this order for a reason: they typically spend 50 to 70% of total project time on prep alone, not on rolling paint. That ratio surprises most homeowners planning their first DIY repaint.
How Long Does Wall Prep Take?
Time budgets shift a lot depending on wall condition, so plan around these ranges rather than a single number.
- Minor prep (light cleaning, a few nail holes): 2 to 4 hours per room
- Moderate repairs (several cracks, some peeling paint, full cleaning): 4 to 8 hours
- Heavy repair or skim coating (large plaster damage, multiple filler layers): 1 to 3 days, mostly waiting on drying time between coats
Drying times vary by product. Lightweight spackle for small holes often dries in under an hour, while setting compound for deeper cracks needs several hours per layer, sometimes overnight for thick fills. Caulk is usually paintable within an hour. Primer generally needs to cure for a few hours minimum, though many manufacturers recommend waiting overnight before applying topcoat. Cold or humid rooms slow all of this down. A fan, an open window, or a dehumidifier speeds drying safely, but skipping straight to a space heater blasted at the wall can cause filler to crack as it dries too fast.
Should You DIY or Hire a Painting Professional?
Small, contained jobs are reasonable DIY territory. Hiring out makes more sense once the scope or risk grows.
Consider a professional when you see:
- Plaster damage spread across a large section rather than a few isolated spots
- Cracks that look structural, especially ones that reappear after filling
- Suspected mold or water staining, which needs proper diagnosis before cosmetic fixes
- Walls that need texture matching or a full skim coat
- A tight timeline that doesn’t leave room for multiple drying cycles
A contractor brings more than extra hands. For homeowners weighing a weekend of sanding against a guaranteed finish, that combination of oversight and warranty coverage often tips the decision.
What Mistakes Ruin a DIY Paint Job?
Most paint failures trace back to a shortcut taken during prep, not a flaw in the paint itself.
- Skipping cleaning entirely. Paint doesn’t bond to dust, grease, or grime, and it shows up as peeling within months.
- Using the wrong filler for the size of the damage. Spackle on a wide crack shrinks and cracks again; setting compound on a tiny nail hole is overkill and hard to sand smooth.
- Under-sanding patched areas. A visible ridge around a patch under fresh paint usually means the sanding stopped too soon.
- Skipping primer on stains or drastic color changes. Stains bleed through even multiple topcoats without a shellac-based primer to block them.
- Loose tape application. Tape pressed on lightly lets paint bleed underneath, leaving ragged lines instead of crisp edges.
If bleed-through appears after painting, a shellac primer patch over the stain followed by a fresh topcoat usually fixes it. Visible patch lines mean more sanding and a thin skim coat, not another layer of paint. Bubbling or blistering often points to moisture trapped under the film, which means stripping that section back to bare wall and letting it dry fully before redoing it.
Pro Tip: For heavily textured walls, run a wet finger over the surface before you start. If water beads up rather than absorbing, the wall likely has an old glossy or oil-based finish underneath, and you’ll need a bonding primer no matter how clean the surface looks.
Who’s Behind This Guide?
This guide draws on practical field experience from Fabian at 5 Star Painting, alongside the company’s other how-to resources on cleaning painted walls and building an interior painting checklist for scheduling a full home repaint.
The company has experience in Singapore’s residential painting market, working on various home types. If your prep reveals damage beyond a weekend fix, that’s exactly the kind of job worth a quote rather than a second trip to the hardware store.
Why Most Wall Prep Advice Undersells the Repair Step
Most generic painting guides treat wall prep like a warmup act before the real work of rolling paint. That framing is backwards. The repair and cleaning stage is where a paint job actually gets decided, and the professional data backs this up: contractors routinely spend more than half their total project hours on prep, not application.
Where I think conventional advice falls short is in treating filler choice and drying time as interchangeable details. They’re not. Using lightweight spackle on a structural crack, or rushing a setting compound before it’s cured, is how patches reappear a year later, ghosted right through fresh paint. The homeowners who get the best results aren’t the ones who paint the fastest. They’re the ones who accept that a wall needs a full day to dry between repair layers sometimes, and who test adhesion with tape before committing to a full room of primer.
If you take one thing from this guide, prioritize the cleaning and repair sequence over the paint color. A mediocre paint on a properly prepped wall will always outperform premium paint on a dirty, unsanded one.
— Fabian
Get Professional Wall Prep and Painting Without the Weekend Project
Every step above is doable yourself, but it takes real time, and mistakes at the repair stage cost you a repaint later. Professional painting services can handle the entire process for HDB flats, condos, and landed homes, from cleaning and patching through priming and final coats, with project management overseeing the job from start to finish.

This service often includes all-inclusive pricing covering labor, paint products, furniture protection, and cleanup, with warranties to ensure coverage if issues arise after work completion. For homeowners weighing a few evenings of scraping and sanding against a guaranteed, professional finish, that trade-off is worth thinking through before you buy a single tub of filler. If your walls need more than a light touch-up, whether that’s HDB flat prep starting from $600 or a full condo repaint from $950, get a quote and see what the job actually involves before committing a weekend to it yourself.
Sources
- Step-by-step Guide to Prepping Your Wall For A Repaint
- Step by Step Guide for Wall Painting Prep
- Interior Painting Wall Prep 2026 | Painters DC
- How to Prepare Walls for Painting | Benjamin Moore
2 Responses