
Skim coat before painting only when the wall has widespread texture, wallpaper glue residue, or more patch repairs than bare drywall. If you’re dealing with a handful of small dents in flat drywall paint, spot-fill and sand instead. Concrete and render need cementitious skim products, not joint compound, and glossy finishes need a full scuff sand no matter which route you choose. Small walls are a reasonable weekend DIY project; ceilings, large rooms, and resale-ready high-gloss finishes are better handed to a professional.
TL;DR:
- Full skim coating is only justified on walls with widespread texture, old adhesive shadows, or heavy repairs, not for minor dents or pinholes.
- Cementitious skim products are essential for concrete or render substrates, while drywall joint compound is designed for gypsum and drywall surfaces.
- Proper surface preparation, correct mixing, and patience during drying and curing are crucial to avoid seams, cracks, and adhesion failure.
- Skim coating typically takes several days for complete curing and drying, especially with cementitious products that need up to a week before painting.
- Hiring a professional makes sense for large rooms, ceilings, or high-gloss finishes to ensure an even, durable surface without the extensive DIY effort.
Table of Contents
- When Is a Full Skim Coat Before Painting Worth It?
- What Materials and Tools Do You Actually Need?
- How Do You Skim Coat a Wall Step by Step?
- How Long Should You Wait Before Painting a Skim Coat?
- What Are the Risks of Skim Coating Yourself?
- Do You Need to Prime a Skim Coat Before Painting?
- What a Professional Skim Coat Job Looks Like
- An Honest Take on Skim Coating Before You Paint
- Ready to Skip the Sanding Dust? Here’s How 5starpainting Helps
- Key Datasheets and Guides to Check Before You Start
- Sources
- FAQ
When Is a Full Skim Coat Before Painting Worth It?
Skim coating the whole wall makes sense when the damage is spread out, not clustered. If you’re patching one nail hole every few feet, you don’t need it. If half the wall looks like orange peel under bad lighting, you do.
Here’s what actually justifies pulling out the trowel for a full skim coat:
- Widespread orange peel or stipple texture you want gone before a smooth paint finish
- Wallpaper removal shadows, where old adhesive left a blotchy, uneven surface texture
- Existing textured finishes (popcorn-adjacent wall textures, heavy roller stipple) that read poorly under modern flat or eggshell paint
- Multiple patch repairs scattered across one wall, where blending them individually would take longer than a single thin coat over everything
If none of that applies, a primer-only approach or targeted spot-filling usually gets you to the same result with a fraction of the labor. Uniform drywall with a few pinholes doesn’t need a trowel; it needs a putty knife and twenty minutes.
Two quick tests settle the question before you commit. First, hold a work light or flashlight at a low, raking angle across the wall in a dark room. Waviness, ridges, and old repair edges throw shadows that flat lighting hides completely. Second, run your open palm across the surface. Your hand catches texture your eyes miss, especially on walls that have been painted over several times.
Be honest about the time cost. A single-wall skim coat with two coats, sanding, and drying typically eats a full weekend once you count dust cleanup. A whole room easily runs four to six days when you factor in drying windows between coats. Weigh that against the alternative: if primer and a good roller technique will hide 90 percent of the flaws anyway, skim coating the entire surface is often more effort than the payoff justifies.
What Materials and Tools Do You Actually Need?
The material choice depends entirely on what’s under the paint. This is where a lot of DIY skim coats go wrong.
Joint compound, sometimes called drywall mud, is designed for gypsum board. It’s soft, sands easily, and dries through evaporation rather than chemical cure. Cementitious skim products are a different animal built for concrete or cement render, common in Singapore’s HDB flats and condo units, and they cure hard rather than just drying out. Using joint compound on bare concrete, or a cementitious skim on drywall, leads to adhesion failures down the line. SikaWall®-198 Skimplas is built specifically for concrete and render substrates, and its datasheet calls for a clean, dust-free surface and dampening on absorbent areas before application.
Your tool list stays fairly consistent regardless of material:
- A wide skim knife or blade, 10 to 14 inches, for spreading and flattening
- A roller for loading joint compound onto larger areas quickly
- A stainless steel trowel for cementitious skims, which resist corrosion better than carbon steel
- A mixing drill with a paddle attachment for lump-free consistency
- A sanding block or pole sander, plus a dust extractor if you have one
- Drop sheets, a dust mask, and eye protection
For Singapore homeowners shopping locally, SikaWall®-110 Skim works well for repairing surface defects on concrete or render, while SUPRACOAT SKIM COAT is a premixed cementitious option built for straightforward trowel application. Once you’ve skimmed and sanded, a Nippon Paint primer matched to your topcoat closes the loop before color goes on.
Pro Tip: Match your sanding grit to the stage. Use 120 grit between coats to knock down ridges without gouging the surface, then finish with 150 to 180 grit before priming for a smooth, paint-ready surface.
How Do You Skim Coat a Wall Step by Step?
Once you know your substrate and have the right material, the process itself follows a fairly forgiving sequence. Rushing any single step is what causes visible seams later.
-
Protect the room. Lay drop sheets, tape off trim and outlets, and pull furniture at least a few feet from the wall. Dust from sanding travels further than you’d expect.
-
Strip and clean the surface. Remove any loose or flaking paint, scrape off wallpaper residue completely, and wash down glossy areas so new material has something to grip. Glossy paint needs a scuff-sand at minimum; skim coat won’t bond to a slick surface.
-
Repair the real damage first. Deep holes, active cracks, and anything structural need filling or professional attention before you skim. A skim coat conceals cosmetic flaws; it does not fix a moving crack or hold a crumbling patch together, and applying it over unstable material almost guarantees it will fail.
-
Prime dusty or bare drywall if the product calls for it, and dampen porous concrete or render surfaces per the manufacturer’s instructions. Skipping this step on thirsty substrates pulls moisture out of your mix too fast and causes cracking.
-
Mix to the right consistency. You’re aiming for something close to yogurt or thick peanut butter, not pancake batter. Use a mixing drill with a paddle attachment rather than mixing by hand, and follow the product’s mix ratio on the bag or bucket. If you’re using joint compound and want a bit more working time and adhesion, mix it very slightly thicker than the package suggests.
-
Apply in small sections. Roll or lay the compound on in a thin, even coat rather than trying to cover the whole wall at once. Working in two to three foot zones keeps the edges wet enough to blend, which avoids the visible lap lines you get when one section dries before you feather into it.
-
Flatten and feather with your blade or trowel. Hold the tool at a shallow angle and drag it across the wet material, applying light, even pressure. For joint compound, aim for a coat around 1/16 to 1/8 inch thick. For cementitious skims like SikaWall®-198 Skimplas, stay in the 1 to 3 millimeter range per pass, matching the manufacturer’s guidance for that product.
-
Let it dry, then sand lightly. Joint compound typically firms up enough to sand within 12 to 24 hours under normal indoor conditions. Cementitious products need to cure fully before sanding, not just dry to the touch. Sand with a block or pole sander using moderate pressure, and vacuum or wipe down the dust thoroughly before applying a second coat. Dust left behind stops the next layer from bonding properly.
-
Repeat only where needed. Most walls need a couple of coats to disappear completely; heavily textured surfaces may require additional coats. Check with raking light after each coat rather than assuming you’re done.
-
Do a final inspection and clean before priming. Run your palm over the wall one more time, check under angled light, and wipe away any remaining dust with a slightly damp cloth. A wall that looks fine under overhead lighting can still show flaws once primer and paint are on, so this step is worth the extra ten minutes.
Pro Tip: Work top to bottom on each section. Drips and drags from a fully loaded blade tend to fall downward, and it’s far easier to smooth them into an area you haven’t finished yet than to fix them after the surface has started to set.
How Long Should You Wait Before Painting a Skim Coat?
Drying and curing are not the same thing, and mixing them up is the single most common mistake in DIY skim coating. Drying is moisture leaving the surface. Curing is the material reaching full strength, and for cementitious products that takes considerably longer.
Joint compound on drywall typically dries in 12 to 24 hours per coat at normal room temperature and humidity. Cementitious skim products run on a completely different clock. SUPRACOAT SKIM COAT’s datasheet recommends holding off on painting for as long as 7 days after application on some systems, and the working time once mixed is only around 60 minutes before it starts to set.
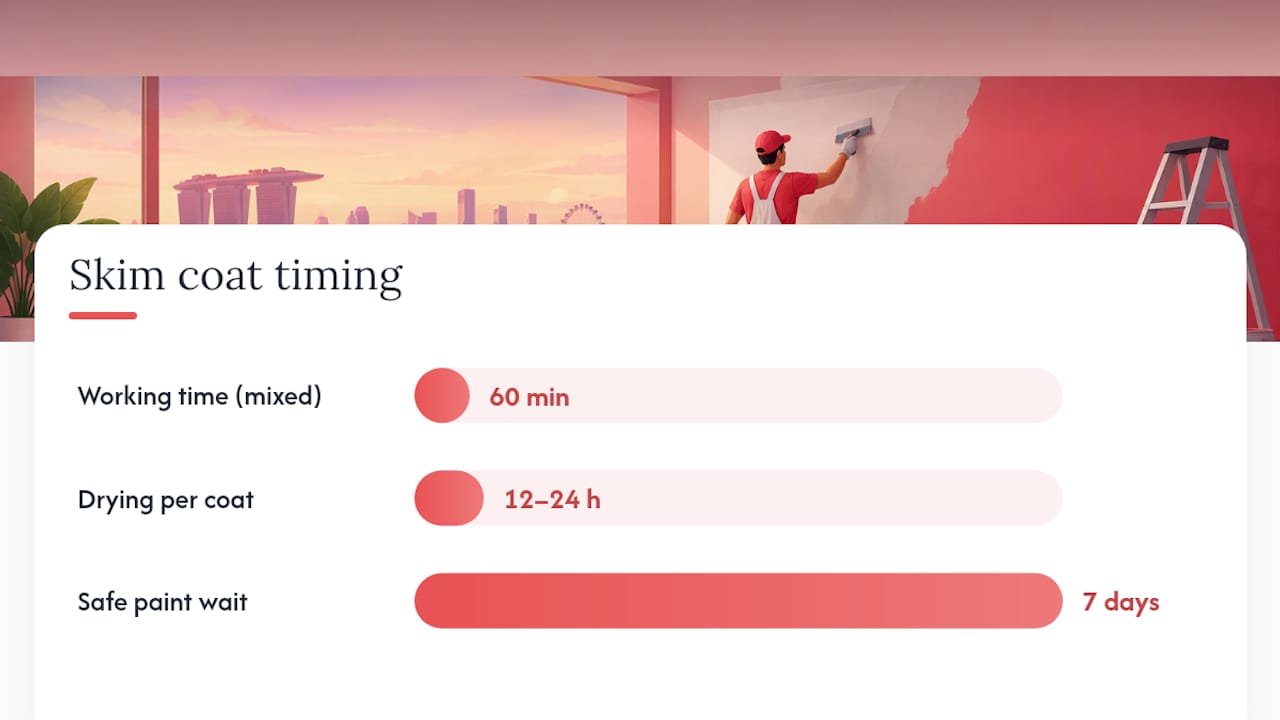
The product datasheet always overrides a generic timeline you find online. Sika and SUPRACOAT publish specific cure windows for a reason, and painting too early on a cementitious skim traps moisture under the paint film, which shows up later as bubbling or peeling.
A few checks tell you if the wall is genuinely ready:
- The surface color looks uniform, with no darker damp patches remaining
- It feels firm and cool but not cold or clammy to the touch
- There’s no tackiness when you press a knuckle against it
- A light scratch with a fingernail doesn’t leave a visible mark
Climate matters more than most guides admit. In hot, dry conditions, cementitious skims can lose surface moisture too fast, which causes shrinkage cracking rather than a proper cure. Sika’s guidance for these products recommends shielding fresh skim coats from direct sun and wind, and misting the surface in very hot or dry air to slow moisture loss to a controlled rate.
What Are the Risks of Skim Coating Yourself?
Skim coating rewards patience and punishes shortcuts. Knowing the common failure points before you start saves you from redoing sections you thought were finished.
The main downsides are straightforward:
- It’s genuinely labor-intensive, especially across ceilings or full rooms
- Sanding generates a lot of fine dust that spreads into adjoining rooms if you don’t seal doorways
- Thin coats are fragile before they’re fully cured or dried, and rough handling during priming can gouge them
- Most jobs need more than one coat, which means more drying time and more sanding passes than beginners expect
- Rushed blending between sections leaves visible seams once paint goes on, particularly under raking light or near windows
Certain situations tip the scale toward hiring a professional rather than tackling it solo. Ceiling work is harder to execute evenly than walls because you’re fighting gravity the entire time. Large open areas, active structural cracks, or walls so uneven they need multiple thick coats all raise the risk of an uneven result. High-gloss finishes are especially unforgiving, since sheen highlights every ripple a flat paint would hide.
If you’re evaluating a contractor, ask specifically about substrate prep, which brand of materials they use, whether there’s a workmanship warranty, who manages the job day to day, and what cleanup looks like once painting wraps. For a deeper look at prep decisions, see this guide on removing textured paint from walls and this one on washing walls before painting.
Do You Need to Prime a Skim Coat Before Painting?
Yes, always. Skipping primer after skim coating is the fastest way to end up with a patchy, uneven-looking paint job even after all that trowel work.
Primer solves a porosity problem. Joint compound and drywall face paper absorb paint differently, and without a barrier coat, that difference shows up as slightly duller or shinier patches once the topcoat goes on. Sheetrock® Brand First Coat™ Primer exists specifically to equalize that porosity so repairs stop reading as visible ghosts under the finish paint.
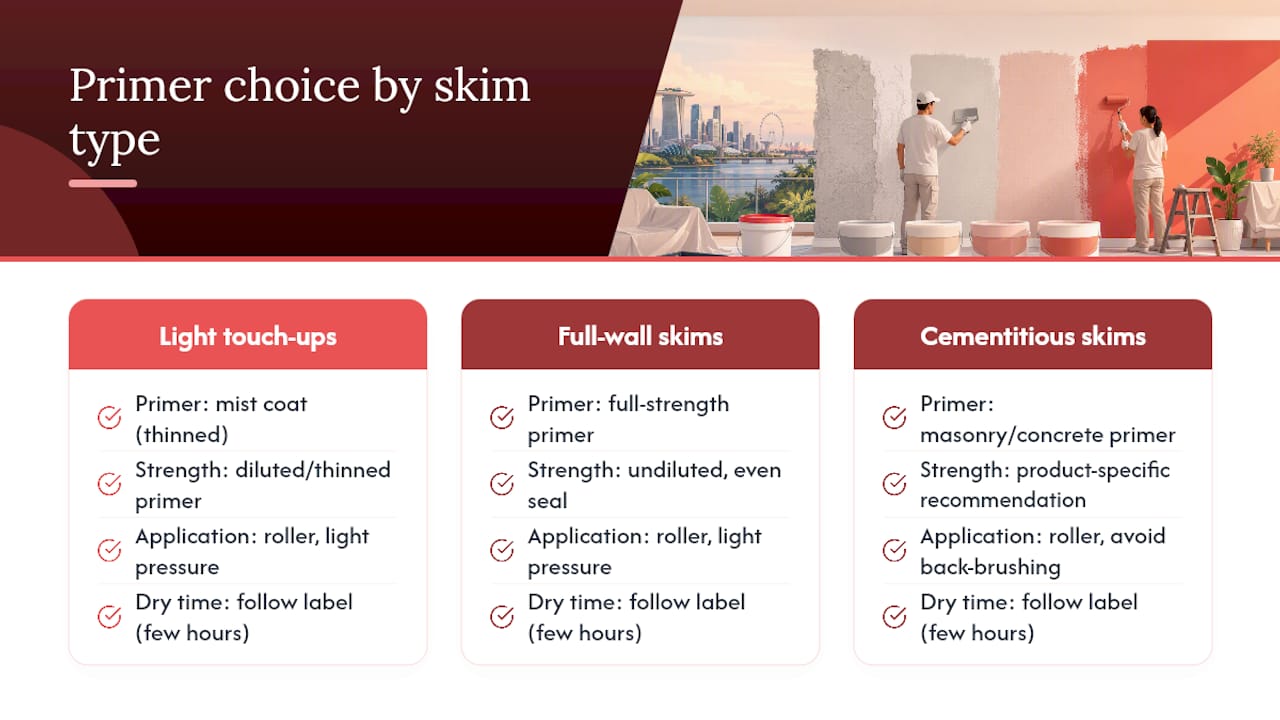
For light touch-up skims, a mist coat, a thinned-down primer coat, often does the job. For full-wall skim coats, use a full-strength primer rather than a diluted version, since the entire surface needs even sealing, not just the patched spots. Cementitious skims generally call for a primer suited to masonry or concrete, which differs from what you’d use over joint compound, so check the product’s own recommendation rather than grabbing whatever primer is already open in the garage.
When applying primer over a fresh skim coat, use a roller with light, even pressure rather than aggressive back-brushing, which can drag and tear a surface that hasn’t fully hardened. Give the primer its full recommended drying time, usually a few hours, before starting your finish coats. For more detail on primer selection, see this guide on what primer paint is and how to apply it, and if you’re dealing with fresh plaster rather than a patch job, this piece on painting new plaster covers mist coat ratios in more detail.
What a Professional Skim Coat Job Looks Like
Most homeowners underestimate how much protection and sequencing goes into a professional skim coat job until they’ve watched one happen. Full-room jobs, resale prep, and high-gloss finish requests are where a crew consistently outperforms a solo DIY attempt, mostly because uneven drying between sections is nearly impossible to avoid without multiple hands working simultaneously.
A professional painting service brings extensive experience to surface prep work across residential properties in Singapore. Jobs typically involve dedicated project management to oversee timelines from preparation through final coating. Furniture protection, genuine paint application, and full post-job cleanup are considered essential elements of quality service, often accompanied by a workmanship warranty.
Homeowners tend to reach for a professional specifically when the job involves a ceiling, a large open living area, or a high-gloss finish where every ripple in the skim coat would show. Expect staged work: protection first, then prep and skim coat, then priming, then finish coats, with drying time built into the schedule rather than rushed.
An Honest Take on Skim Coating Before You Paint
The conventional advice on skim coating treats it as a default step, something you do because it sounds thorough. That’s backward. The datasheets from Sika and SUPRACOAT are more useful than most painting blogs precisely because they’re specific: exact millimeter thicknesses, exact cure windows, exact conditions for protecting a fresh coat. Generic DIY guides average these numbers into something vaguer, and vague numbers are how homeowners end up painting over a skim coat that hasn’t actually cured.
If there’s one thing worth prioritizing over everything else in this guide, it’s substrate identification. Knowing whether you’re working with drywall or concrete determines which product family you buy, which tools you use, and how long you wait before touching a roller to the wall. Get that wrong and no amount of careful trowel technique saves the job.
Where I’d push back hardest on typical advice: skim coating an entire small wall for a couple of scattered dents wastes a weekend. Spot-fill it. Save the full skim coat for walls where the damage is genuinely everywhere, and save your patience for the curing wait, which is the step every rushed DIY job skips.
— Fabian
Ready to Skip the Sanding Dust? Here’s How 5starpainting Helps
If reading through mixing ratios, cure windows, and raking light tests has you leaning toward hiring it out, that instinct is reasonable, especially for full rooms or resale-ready finishes. 5starpainting handles the entire sequence, surface prep, skim coating where it’s genuinely needed, priming, and finish coats, under one all-inclusive price with no hidden fees added after the quote.

Every job includes genuine Nippon Paint, furniture protection, full cleanup, and a one-year warranty, backed by a dedicated project manager who keeps the timeline on track from start to finish. HDB flat owners can review package details on the HDB painting services page, where the HDB Basic Package starts at $600 to $1,600 one-off depending on scope. Condo owners can check the condo painting services page for packages that include the same surface prep and Nippon Paint finish coats. Request a quote through either page to get a scope and price for your specific unit before committing to a DIY weekend that might turn into two.
Key Datasheets and Guides to Check Before You Start
Manufacturer datasheets carry more weight than general advice because they reflect the exact product in your bucket. SikaWall®-198 Skimplas and SikaWall®-110 Skim cover concrete and render applications with specific mixing and curing instructions, while the SUPRACOAT SKIM COAT datasheet lays out workable time and paint-ready curing periods. For drywall and gypsum work, USG’s Sheetrock First Coat primer guidance explains porosity equalization, and The Spruce’s skim coating tutorial offers a beginner-friendly walkthrough of the joint compound process from start to finish.
Sources
- How to Skim Coat Walls | The Spruce
- SikaWall®-198 Skimplas product datasheet
- Sheetrock® Brand First Coat™ Primer | USG
- SUPRACOAT SKIM COAT product datasheet
FAQ
Can You Paint Directly Over a Skim Coat?
Not immediately. You need to prime first, since primer equalizes the surface’s porosity so paint doesn’t absorb unevenly between the skim coat and the surrounding drywall. Skipping primer usually produces a patchy, mismatched sheen once the topcoat dries.
What Are the Disadvantages of Skim Coating?
Skim coating is labor-intensive, generates significant sanding dust, and produces a thin layer that’s fragile until it’s fully dry or cured. Most walls need more than one coat, and rushed blending between sections tends to leave visible seams once paint highlights every imperfection.
How Long Should You Wait Before Painting a Skim Coat?
Joint compound is typically ready to paint after 12 to 24 hours of drying per coat under normal room conditions. Cementitious skim products need much longer, with some SUPRACOAT systems requiring up to 7 days of cure before painting begins.
Can a Beginner Skim Coat a Wall?
Yes, a beginner can skim coat a small wall with practice, especially using joint compound on drywall, which forgives minor technique errors more than cementitious products do. Start with a small, low-visibility wall first, and expect to sand between coats more than once before the surface reads smooth.