
Do not paint over active mould. It will not disappear under a coat of paint, and it will not stay quiet for long. The correct sequence is to assess the extent, protect yourself and the room, clean or remove the affected material, dry it completely, then seal it with a mould-inhibiting, stain-blocking primer before you repaint. Skip any one of those steps and you are looking at peeling, staining, or a repeat job within months.
TL;DR:
- Any mold growth larger than 10 square feet on porous surfaces requires professional removal instead of DIY cleaning.
- Proper mold removal includes fixing moisture sources, thorough drying for 24-48 hours, and sealing with a mold-inhibiting primer before repainting.
- Use appropriate safety gear such as N95 respirators, gloves, and sealed goggles for all mold remediation efforts to prevent spores from affecting health.
- Bleach is ineffective on porous materials and may only lighten surface stains; hydrogen peroxide or fungicidal cleaners penetrate better and eliminate mold roots.
- Rushing the drying step or skipping sealing and priming often leads to mold reappearance within a few months, making patience and sequence crucial.
Table of Contents
- How Do You Know If It’s Mildew or Mould Before Painting?
- What Safety Gear Do You Need Before Removing Mould?
- What’s the Best Way to Clean Mould Off Different Surfaces?
- When Do You Need to Cut Out and Replace Materials Instead of Cleaning?
- How Long Should You Wait for Walls to Dry Before Priming?
- Which Primer and Paint Should You Use After Mould Removal?
- What Tools and Products Do You Need to Buy Locally?
- What Do Contractors Check Before They Call a Wall Ready to Paint?
- Where the Usual Advice on Mould and Paint Gets It Wrong
- When Should You Call a Professional Instead of Doing It Yourself?
- Where Can You Find More Technical Guidance on Mould and Paint?
- Sources
- FAQ
How Do You Know If It’s Mildew or Mould Before Painting?
Not every dark spot on a wall needs the same response. Mildew is typically a thin, black or gray surface growth that sits on top of paint or grout and wipes away fairly easily with a damp cloth and some detergent. Mould goes further. It has texture, it can look fuzzy or slimy, and it often leaves a stain behind even after you have scrubbed the visible growth away.
A simple touch test helps here. Dab a small amount of diluted bleach on the spot with a cotton swab. If the stain lightens within a couple of minutes, you are probably dealing with mildew. If it stays dark, you are looking at mould that has likely worked into the surface.
Size matters just as much as appearance. Areas of roughly 10 square feet or less on non-porous surfaces are generally within reach of a careful homeowner with the right gear. Anything larger, or mould that keeps reappearing in the same spot after you have dried and cleaned it, points to a bigger problem behind the wall.
Watch for these red flags before you commit to a DIY clean:
- Musty smell in a room with no visible growth, which often means mould is active behind wallpaper, paneling, or drywall.
- Staining that returns within days of drying, a sign the moisture source hasn’t been fixed.
- Bubbling, soft, or crumbling drywall, which usually means the material itself has been compromised.
- Growth that spans multiple wall sections or crosses a corner, suggesting the problem started inside a wall cavity.
If any of those apply, treat it as a job for assessment beyond a sponge and a spray bottle.
What Safety Gear Do You Need Before Removing Mould?
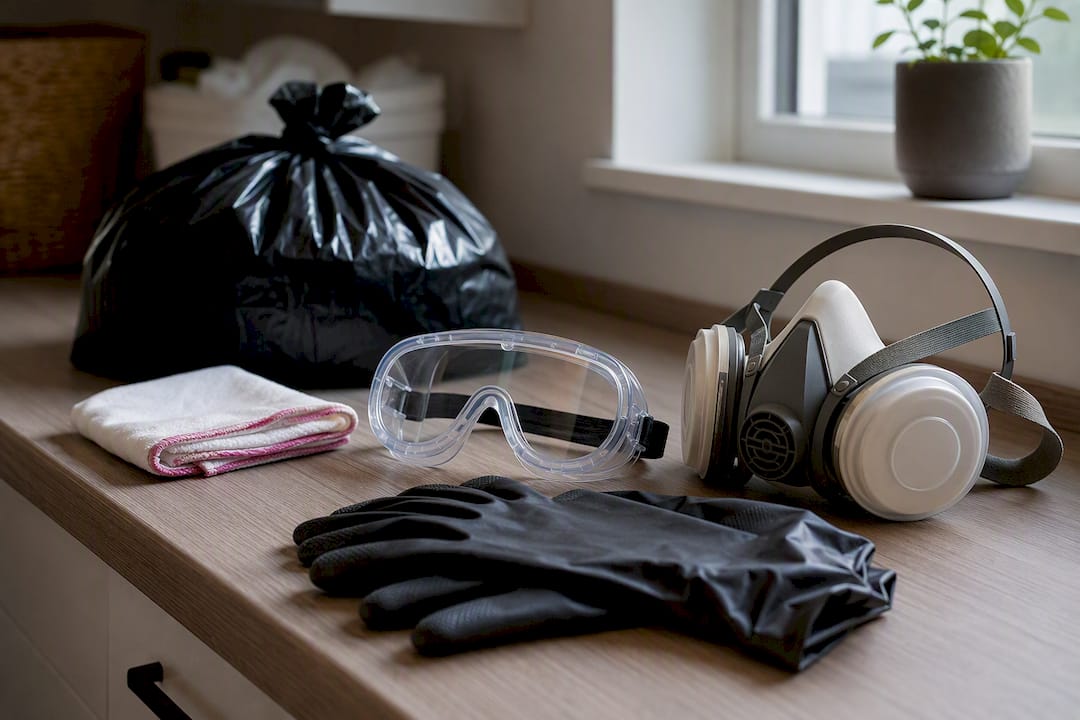
Disturbing mould releases spores into the air, and that’s the main reason contractors don’t skip protective gear even for small jobs. Breathing in a concentrated cloud of spores while scrubbing a bathroom ceiling is a bad trade for saving five minutes.
Before you touch a contaminated surface, gather this checklist:
- An N95 respirator at minimum, or a half-face respirator with P100 filters for larger areas.
- Nitrile or rubber gloves that extend past the wrist.
- Sealed goggles, not open safety glasses, since spores can irritate eyes.
- Old clothing or a disposable coverall you can bag afterward.
Open windows and run a fan pointed outward, not into the room, so you are pushing spore-laden air out rather than circulating it. For anything beyond a small patch, tape plastic sheeting over doorways to keep spores from drifting into the rest of the house while you work.
Bag contaminated rags, sponges, and disposable gear in sealed plastic before they go in the outdoor trash. Reusable cloths should be laundered separately on the hottest setting the fabric allows, then run through an empty hot cycle afterward to clear the machine.
Pro Tip: Run your exhaust fan or a box fan facing outward for at least an hour after you finish cleaning, not just while you work. Spores stay airborne longer than most people expect.
What’s the Best Way to Clean Mould Off Different Surfaces?
The right cleaning method depends almost entirely on what the mould is growing on. A painted, washable wall behaves differently than bare timber, and treating them the same way either wastes effort or damages the surface.
Step 1: Start gentle on washable painted walls.
Mix warm water with a mild detergent and wipe the area with a soft sponge, working from the outer edge of the stain inward so you don’t spread spores to clean sections. Avoid stiff brushes on painted surfaces since they can scuff the finish and create texture that traps future moisture. If the stain lifts fully at this stage, rinse with clean water and let the wall dry before deciding whether it needs a primer coat at all.
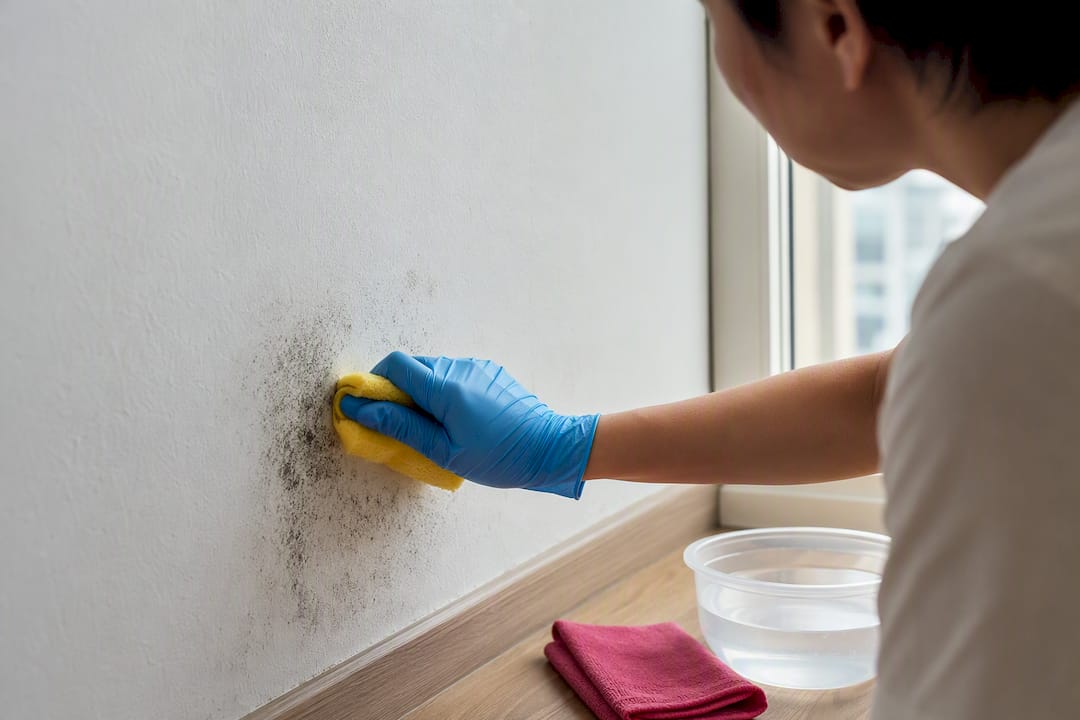
Step 2: Step up to a household fungicide if detergent isn’t enough.
Mold vs Mildew on Walls: How to Tell the Difference recommends moving to a targeted fungicidal cleaner or a household treatment when plain detergent leaves a stain behind. White vinegar at roughly 5% acidity works on many surface mould types; spray it undiluted, let it sit for about an hour, then wipe and rinse. For tougher spots, 3% hydrogen peroxide is a strong option: spray it directly on the stain, give it 10 minutes to work, scrub lightly, then rinse with clean water and let the area dry fully.
Hydrogen peroxide has an advantage that matters specifically for pre-paint prep. It penetrates porous materials better than bleach and breaks down into water and oxygen, leaving less chemical residue to interfere with paint adhesion later.
Step 3: Bring in a specialist fungicidal cleaner for stubborn or recurring patches.
Products sold specifically as fungicidal washes are formulated to kill mould at the root rather than just bleach the surface stain. Follow the label’s PPE and ventilation instructions exactly. These products are often stronger than household options, and manufacturers size their safety guidance accordingly.
Step 4: Understand where bleach actually fits.
Bleach has a real limitation homeowners often miss. It disinfects hard, non-porous surfaces like tile or glazed ceramic effectively, but on porous materials such as drywall, plaster, or unsealed timber, bleach mainly lightens the visible stain rather than killing the mould underneath. It can’t reach mould roots buried in a porous substrate, and the added moisture from a bleach solution can actually feed the very growth you’re trying to eliminate.
Use bleach only on non-porous surfaces, always diluted per the label, and rinse thoroughly afterward. Leftover bleach residue can affect how well primer and paint bond once you get to that stage.
Whichever method you use, the sequence stays the same: clean, rinse, dry completely, then move to priming. Skipping the rinse step is a common mistake. Leftover cleaning solution residue, whether from vinegar, peroxide, or a fungicidal wash, can leave a film that keeps primer from bonding properly.
When Do You Need to Cut Out and Replace Materials Instead of Cleaning?
Surface cleaning has a ceiling, and porous building materials sit right at it. Surface chemicals rarely reach mould hyphae once they’ve grown into plasterboard or wood, meaning you can scrub a spot clean on the outside while the growth continues underneath, invisible until it reappears.
Look for these signs that a section needs to come out rather than get cleaned:
- Drywall that feels soft, spongy, or crumbles when you press it lightly.
- Wallpaper with mould growing beneath the paper itself, not just on the printed surface.
- Timber that has darkened, warped, or developed a spongy texture near a joint or sill.
- Any material that has been wet for more than 48 hours without drying, since mould colonization typically begins within that window.
- A musty smell that persists even after the visible surface has been cleaned and dried.
A homeowner-level repair on a small drywall patch, roughly the size of a dinner plate or smaller, is usually manageable: cut back to solid, dry material, replace with a matching patch, tape and mud the seams, then let it cure fully before priming. Anything larger, structural (near a stud, joist, or load-bearing element), or recurring in the same spot after a previous repair is worth a professional assessment. Trying to patch around active mould instead of removing it fully tends to cost more in the long run than doing it right the first time.
How Long Should You Wait for Walls to Dry Before Priming?
Paint failure after mould remediation almost always traces back to one thing: moisture that wasn’t actually gone when the primer went on. A wall can look dry within a few hours of cleaning and still hold moisture inside the material for days.
Give cleaned surfaces at least 24 to 48 hours to dry under normal ventilation before priming, longer in humid climates or poorly ventilated rooms. A simple touch test, where the surface feels cool or damp, is a reliable warning sign that it isn’t ready. A moisture meter, available cheaply at most hardware stores, gives a more exact reading if you want confidence beyond touch and sight.
Drying the surface only solves half the problem. Removing mould has to include fixing whatever caused the moisture in the first place, or the same patch reappears within weeks.
- Check for slow leaks around pipes, windows, and roof lines before assuming the cause is “just humidity.”
- Run an exhaust fan during and after showers, and for at least 20 minutes afterward, if bathroom condensation is the source.
- Add a dehumidifier in rooms that run consistently damp, particularly ground-floor rooms and enclosed laundry areas.
- Recheck the treated area weekly for a month after painting to catch any early signs of return.
Pro Tip: If a wall keeps growing mould in the exact same spot no matter how well you clean it, the problem usually isn’t your cleaning technique. It’s a moisture source you haven’t found yet.
Which Primer and Paint Should You Use After Mould Removal?
The primer you choose after mould removal matters more than the topcoat. A stain-blocking, mildew-resistant primer is built specifically to seal residual staining and give paint a stable surface to grip, and some formulations are designed to kill remaining spores on contact rather than just cover them.
When you’re shopping for one, check for these features:
- A biocide additive listed specifically for mould and mildew resistance, not just general “stain blocking.”
- Compatibility with the substrate you’re covering, since drywall, plaster, and timber primers aren’t always interchangeable.
- A stated recoat window, which tells you how long to wait before applying topcoat.
That recoat window is not a suggestion. Applying topcoat before the primer has fully cured, or before residual moisture has dissipated, is one of the most common causes of stain bleed and adhesion failure that contractors get called back to fix. Read the can, not just the general rule of thumb.
Anti-mould topcoats have a real but limited role. They help prevent recurrence on a surface that’s already clean and dry, but they are a maintenance tool, not a remediation tool and won’t cure a substrate that’s still actively growing mould underneath.
What Tools and Products Do You Need to Buy Locally?
Most of what you need for a mould removal job before painting sits on a single aisle at a hardware or paint store, and none of it requires a special order.
For protection, pick up an N95 or P100 respirator, nitrile gloves, and sealed goggles. Add a stain-blocking, mould-inhibiting primer to the cart before you leave, since running out mid-project means a wall sits half-treated overnight.
On the tools side, you’ll want a stiff-but-not-abrasive scrub pad, a couple of clean spray bottles for applying your cleaning solutions evenly, and a few disposable rags. A basic moisture meter runs cheap and takes the guesswork out of deciding when a wall is actually dry. Keep heavy-duty trash bags on hand for sealing contaminated material before disposal, and if you’re also cleaning painted interior doors as part of the job, gentle cleaning methods for interior woodwork work well without stripping the existing finish.
What Do Contractors Check Before They Call a Wall Ready to Paint?
Homeowners tend to judge “ready to paint” by how a wall looks. Contractors judge it by how it tests. A wall can appear perfectly dry and still fail a moisture check, and that gap accounts for a large share of the callbacks painters see on jobs that followed a mould problem.
The most common mistake isn’t skipping the cleaning step. It’s rushing the drying step because the wall looks fine after 24 hours. Looking dry and being dry are two different things, and paint doesn’t forgive the difference.
A thorough wall prep process checks moisture content, confirms the primer has fully cured within its stated window, and inspects for any staining that bled through overnight before the topcoat goes on. Stain bleed after painting almost always means the primer didn’t fully seal the area, or the substrate was still holding moisture. Adhesion failure, where paint peels in sheets rather than chips, usually traces back to that same rushed timeline. A written quote or warranty for a repainting job should specify what happens if either issue shows up within the first year, since that protects you from paying twice for the same wall.
Where the Usual Advice on Mould and Paint Gets It Wrong
Most guides treat mould removal as a cleaning problem. It’s a moisture problem with a cleaning step attached, and that distinction changes how you should spend your time. Scrubbing harder or switching to a stronger chemical rarely fixes a wall that keeps growing mould, because the growth was never really about dirt. It was about a leak, a ventilation gap, or condensation that never got solved.
The conventional advice to “just use bleach” also deserves more scrutiny than it gets. Bleach works on tile and glass. On drywall or timber, it often just bleaches the surface while leaving the actual growth intact underneath, which explains why so many homeowners report the same stain coming back within a season of “successfully” cleaning it.
If there’s one priority to take from this, it’s sequencing over speed. Assess honestly, fix the water source, dry the wall longer than feels necessary, then prime and paint. Rushing any single step, especially drying, is the single biggest reason DIY mould jobs fail within a year. A professional crew earns its fee mostly by refusing to skip that patience.
— Fabian
When Should You Call a Professional Instead of Doing It Yourself?
DIY cleaning handles a lot, but it has real limits once mould has spread across a wall section, hidden behind wallpaper, or kept returning after a proper clean and dry. Professional remediation covers what a spray bottle can’t: full containment so spores don’t spread to the rest of the home, cutting out and replacing compromised drywall or timber, and a warranty that backs the work if staining or peeling shows up later.

The coverage includes all-inclusive packages with genuine paint, surface preparation, furniture protection, post-job cleanup, and a one-year warranty with no hidden fees after the quote. Each job also typically has a single point of contact for updates.
If you’re weighing DIY against hiring out, ask any quote for three things: how they handle moisture verification before priming, what primer they’re using and why, and what the warranty covers if mould or staining reappears. For HDB flats, the HDB painting packages outline what’s included at each tier, and condo owners can check the condo painting packages for comparable coverage. Reach out for a quote once you know the scope of the affected area, and let a project manager walk you through what’s included before you commit.
Where Can You Find More Technical Guidance on Mould and Paint?
Homeowners who want to go deeper than this guide have a few solid places to look, each covering a different angle of the problem.
- Painters.edu.au’s mould treatment guide breaks down why hydrogen peroxide outperforms bleach on porous materials and how to sequence a proper pre-paint treatment.
- MoldStar’s mold vs mildew comparison lays out the size and location thresholds that separate a DIY job from a professional remediation call.
- Rawlins Paints’ black mould guide focuses on the moisture-source side of prevention, which most cleaning guides skip.
- Rust-Oleum’s Zinsser primer technical data sheet gives exact cure times and application specs for mould-killing primers.
Sources
- Zinsser mold-killing primer technical data (Rust-Oleum)
- Mold vs Mildew: How to Tell the Difference | MoldStar
- Painters
- Mold vs Mildew on Walls: How to Tell the Difference – InspectandTest
- Black mould on walls: How to remove it safely and stop it returning (Rawlins Paints)
FAQ
Should you remove mold before painting?
Yes. Painting over active mold traps moisture and spores under the new coat, which typically leads to peeling, staining, or the mold reappearing within months.
How can I kill mold before painting?
Clean the area with detergent first, then step up to white vinegar, 3% hydrogen peroxide, or a specialist fungicidal cleaner if the stain persists, always rinsing and letting the surface dry fully afterward.
Can you paint over mold after cleaning?
Only once the surface has been cleaned, dried completely (typically 24 to 48 hours), and sealed with a mould-inhibiting, stain-blocking primer; painting over a damp or still-stained surface risks bleed-through and peeling.
What should you do before painting over mold?
Assess the size and depth of the growth, wear proper PPE, clean with an appropriate method for the surface, replace any porous material that’s compromised, fix the moisture source, and let everything dry fully before priming.
Does bleach work for mold removal before painting?
Bleach works well on hard, non-porous surfaces like tile, but it mainly lightens stains on porous materials like drywall or timber without killing mold at the root, so hydrogen peroxide or a fungicidal cleaner is usually the better choice there.
One Response