
A professional house painting process runs contractor-managed from estimate to handover: a written scope, thorough surface prep, primer where the substrate needs it, and two full finish coats, all under a project manager who signs off with you at the final walkthrough. Your job stays simple: approve colors, clear the site, and inspect the work before paying the balance.
TL;DR:
- Surface preparation, including patching, sanding, and priming, typically consumes more time than actual painting and is crucial for longevity.
- Estimates should list specific scope, surface treatments, paint brands, coats, sheen levels, and payment terms to prevent hidden costs and project delays.
- Proper site protection involves thorough dust control, masking fixtures, and safeguarding floors, especially if drywall repairs are required beforehand.
- Waiting for full cure before reoccupying or cleaning is essential, with full project timelines often spanning four to twelve weeks for entire homes.
- A detailed final walkthrough using raking light helps identify imperfections, ensuring deficiencies are fixed before final payment and warranty registration.
Table of Contents
- The house painting process, stage by stage
- What should a painting estimate and contract include?
- How does surface prep and site protection work?
- What paint application standards should you expect?
- How long does a house painting project take?
- What happens at the final walkthrough?
- What actually separates a good paint job from a forgettable one?
- Ready to request a painting estimate?
- Sources
The house painting process, stage by stage
A complete residential paint job breaks into six practical stages, and the order matters more than most homeowners expect. According to a detailed breakdown of the residential painting process, the sequence runs like this:
- Estimate and color sign-off. The contractor walks the property, measures surfaces, and confirms your color choices before quoting.
- Contract and deposit. You sign a written agreement and pay an agreed deposit, not the full balance.
- Homeowner prep. You clear breakables, move small items, and flag areas needing repair.
- Crew prep and masking. The team protects floors and furniture, patches damage, sands, and masks trim and fixtures.
- Primer and two finish coats. Primer goes down where the surface demands it, followed by two full coats.
- Walkthrough and touch-ups. You and the project manager inspect the work together before final payment.
Here’s what surprises most first-time hirers: prep almost always eats more hours than the painting itself. Patching, sanding, caulking, and priming take real time, and skipping any of them is the single biggest reason a paint job looks great for six months and then fails. A project manager typically oversees stages three through six, coordinating the crew’s schedule and confirming the warranty terms before the invoice closes out.
What should a painting estimate and contract include?
A vague quote is the fastest way to end up with hidden costs. A trustworthy estimate reads like a checklist, not a paragraph, and comparing bids only works when each one lists the same categories.
Before you sign anything, confirm the estimate covers:
- The full scope of work, room by room or surface by surface
- Surface prep tasks included (patching, sanding, caulking) and what counts as extra
- The paint brand and specific product line for each surface
- The number of coats, stated explicitly, not implied
- The sheen level for walls, trim, and ceilings
- A start date and estimated completion window
- The payment schedule, including deposit amount and balance timing
- How change orders get priced and approved
A line-item estimate makes bids easy to compare and signals a contractor who has actually thought through your job rather than eyeballing a number. Ask for proof of insurance and a written workmanship warranty before you sign, and get the exact colour codes and tint formulas written into the invoice, not just verbally confirmed.
Pro Tip: If a contractor won’t put the number of coats in writing, assume you’re getting one coat and a lot of touch-up requests later.
Watch for these red flags during bidding: verbal-only quotes with nothing on paper, bids built around a single coat, and pricing that looks too good next to vague or missing prep details. Unusually low estimates and requests for full payment upfront are common warning signs worth pressing on before you commit.
How does surface prep and site protection work?
Surface prep is where a paint job earns its lifespan or loses it early. A professional crew works through a defined set of tasks before a brush ever touches a wall, and confirming these are in scope protects you from surprise add-on charges mid-job.
Expect the crew to handle:
- Cleaning surfaces to remove grease, dust, and grime
- Filling holes and cracks, then sanding them smooth
- Caulking gaps around trim, windows, and baseboards
- Spot-priming stains, water marks, or raw wood before topcoating
On the protection side, a good crew moves or covers furniture, lays down floor protection, masks trim and fixtures, and manages dust so the rest of your home stays livable during the job. Wall-washing before painting sounds minor but affects how well primer and paint actually bond, and floor protection done right prevents drips and scuffs from becoming a separate repair bill. If your property needs plaster repair or drywall replacement before painting, that’s a different trade, and it should be documented as a change order with its own cost and timeline impact, not folded silently into the paint estimate. You can find out more about whether painters move furniture themselves or expect you to clear rooms in advance.
What paint application standards should you expect?
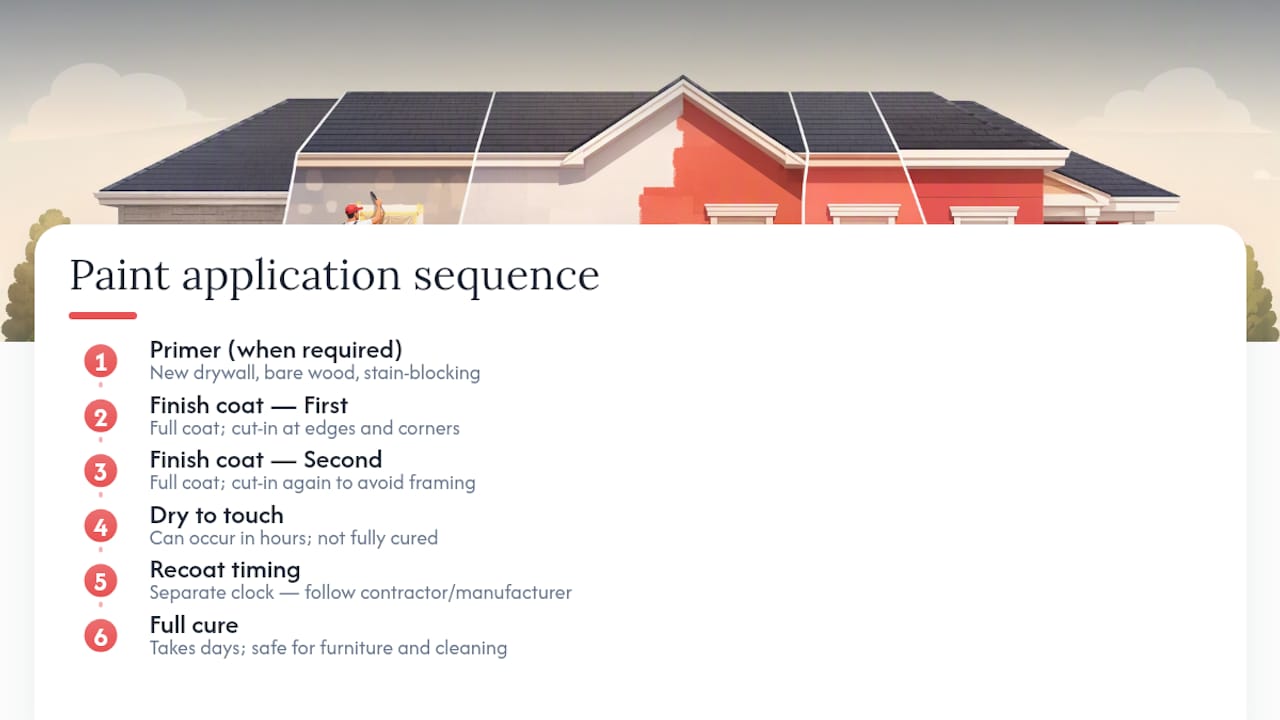
Primer isn’t optional everywhere, but it isn’t universal either. New drywall, stain-blocking situations, and bare wood all call for a dedicated primer coat, and a paint-and-primer-in-one product won’t cover for a true primer in those cases no matter what the label promises.
Beyond that, two full finish coats are the professional standard, applied with careful cutting-in at edges and corners. Cutting-in twice, once per coat, matters more than it sounds: skip the second pass and you risk picture-framing, where the brushed edges dry a visibly different sheen than the rolled center of the wall. Cutting in on both coats is a trade-standard technique specifically because it keeps sheen and thickness consistent across the whole surface, not just close to it.
Drying, recoating, and full cure are three different clocks. A wall can be dry to the touch in hours but still need days to fully cure before it can handle furniture pressed against it or heavy cleaning. Ask your contractor when rooms can be reoccupied and when furniture can safely go back, rather than assuming “dry” means “done.”
How long does a house painting project take?
Plan in weeks, not days, especially for a whole-home repaint. A single bedroom might wrap in a day or two of active painting once prep is done, but a full property, including consultation, color selection, and scheduling, commonly runs 4 to 12 weeks from first consultation to completion.
To keep your project on track:
- Book your consultation several weeks ahead, especially during peak renovation seasons when good crews fill their calendars fast.
- Confirm your color decisions early, since delays in sign-off push the whole schedule back.
- Sequence rooms so you always have a livable space, working around the areas under active work.
- Clarify daily access hours with your project manager so deliveries, pets, and family routines don’t collide with crew schedules.
Pro Tip: Off-peak booking (avoiding the weeks right before major holidays) often gets you a more attentive crew and a tighter schedule than squeezing in during the busy season.
What happens at the final walkthrough?
The walkthrough is your last real checkpoint before money changes hands, and it’s worth doing properly rather than rushing through it. Walk each room with a flashlight held at a raking angle across the walls. This lighting angle reveals roller marks, thin spots, and missed touch-ups that overhead lighting hides completely.
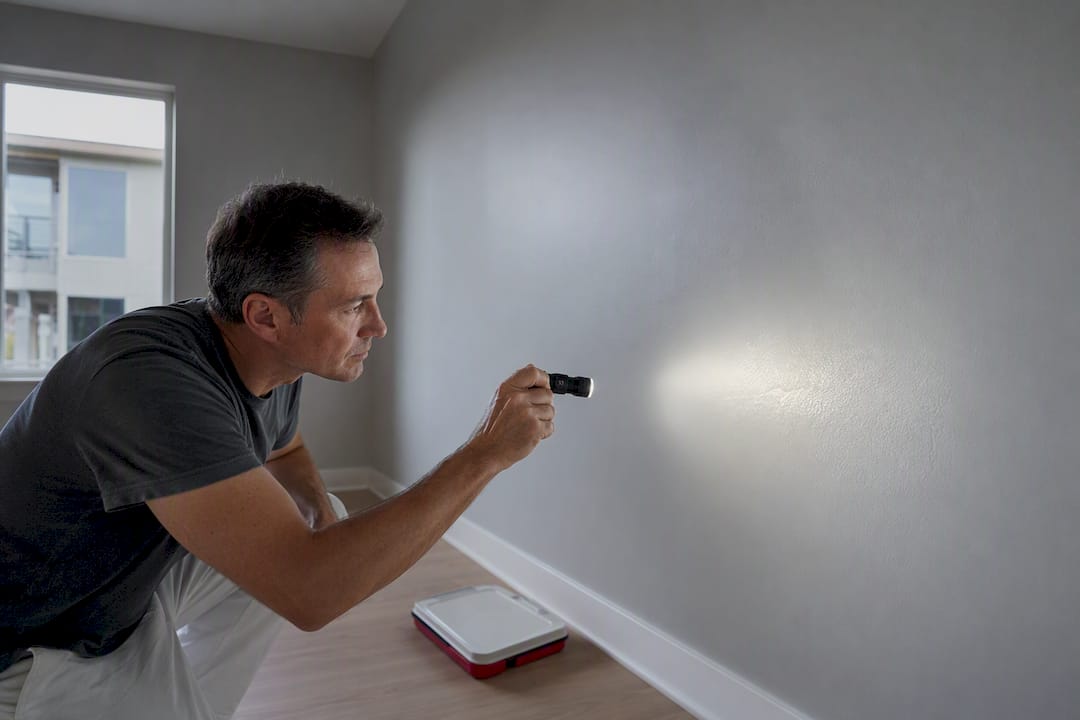
Describe any defects specifically (“scuff near the closet door, three feet up”) rather than vaguely, so the fix list is unambiguous. A fair deficiency list is specific and time-bound, and your final balance should come due only after those listed items get corrected, not before.
Before you release final payment, confirm you receive:
- Written colour codes and tint formulas for every room
- Labeled leftover paint for future touch-ups
- The written warranty document, including its duration and what it excludes
Good crews also treat daily cleanup as separate from final cleanup, meaning your home isn’t buried in drop cloths and tools until the very last day.
What actually separates a good paint job from a forgettable one?
The paint itself gets too much credit, and the prep work gets too little. Homeowners fixate on brand names and finish sheens during the quoting stage, when the real predictor of how a job ages is whether the crew caulked properly, primed the right spots, and cut in twice instead of once. A contractor who talks you through prep in detail is telling you more about the outcome than one who talks you through their paint catalog.
5starpainting’s approach reflects that priority. Over three decades of painting HDB flats, condos, and landed homes in Singapore, the company built its process around all-inclusive pricing that folds labor, genuine Nippon Paint, furniture protection, and cleanup into one number, with an assigned project manager coordinating every stage. That role matters more than it sounds: a project manager is the person who catches scope creep before it becomes a change-order argument and keeps trade sequencing from turning into a scheduling mess. A written warranty backs the work once the crew leaves, which is the only real assurance that “durable finish” wasn’t just a sales phrase.
— Fabian
Ready to request a painting estimate?
Getting an accurate quote starts with a few things ready before your consultation: photos of each room, a list of spaces you want painted, any known repairs (cracks, water stains, peeling patches), your preferred timing, and any color ideas you’re already leaning toward. The more specific you are upfront, the tighter the estimate.

5starpainting builds every quote as one all-inclusive number covering labor, genuine Nippon Paint, furniture protection, and cleanup, so there’s no separate bill waiting after the crew packs up. Every job gets an assigned project manager from estimate through final walkthrough, and every finish is backed by a written workmanship warranty. If you’re weighing bids right now, the main services page walks through what’s included, and homeowners in HDB flats can see starting packages on the HDB painting services page, while condo owners can check scope and pricing on the condo painting services page. Request a walkthrough and you’ll typically hear back with a detailed estimate within a few business days.
Sources
- Residential Painting Process Toronto: What to Expect Start to Finish
- How to Find the Right House Painter in 2026 – Taskrabbit
- Whole-Home Interior Painting Timeline: Complete Planning Guide (2026) | D&D Pro Painting
One Response