
A water stain on your ceiling means water has already entered your home. Stop the source before touching the stain. That is the single most important rule, and everything else in this guide follows from it.
Here is what to do in the next 10 minutes:
- Shut off the water supply at the nearest valve if you suspect a plumbing leak above.
- Place buckets or towels under any active drip and move furniture, electronics, and rugs out of the area.
- Check for sagging drywall by pressing the stained area gently. If it feels soft, spongy, or bows downward, do not press harder. Saturated drywall can collapse under its own weight.
- Turn off the circuit breaker for any room where water is near a light fixture or ceiling fan. Water and live wiring are an immediate hazard.
Judge urgency in 10 seconds: soft or sagging drywall, active dripping, or water contacting electrical fixtures means you have an emergency. Call a professional today. A dry, discolored ring with firm drywall around it is a cosmetic problem you can likely fix yourself over a weekend.
Mold can begin growing within 24–48 hours of water exposure in warm conditions, so drying the area quickly is not optional. The IICRC (Institute of Inspection, Cleaning and Restoration Certification) sets professional intervention thresholds that this guide references throughout to help you decide when DIY stops being safe.
Pro Tip: Photograph the stain before you do anything else. The shape, color, and size help you track whether it is growing and give a contractor useful baseline information if you need to call one.
Table of Contents
- What causes water stains on ceilings?
- How serious is the stain, and when should you call a professional?
- Step-by-step DIY repair for small, dry stains
- What materials and tools do you need?
- How long does repair take, and what does it cost?
- How do you prevent ceiling stains from coming back?
- Professional tips, common mistakes, and evidence-based thresholds
- Key Takeaways
- The part most guides skip
- Ready for a professional ceiling finish after your repair?
- Useful sources
What causes water stains on ceilings?
The stain’s location, shape, and timing are your best diagnostic clues. Water rarely drops straight down from its entry point. It follows framing, insulation, and pipes before pooling at a low spot, so the visible mark on your ceiling is often several feet away from the actual source.
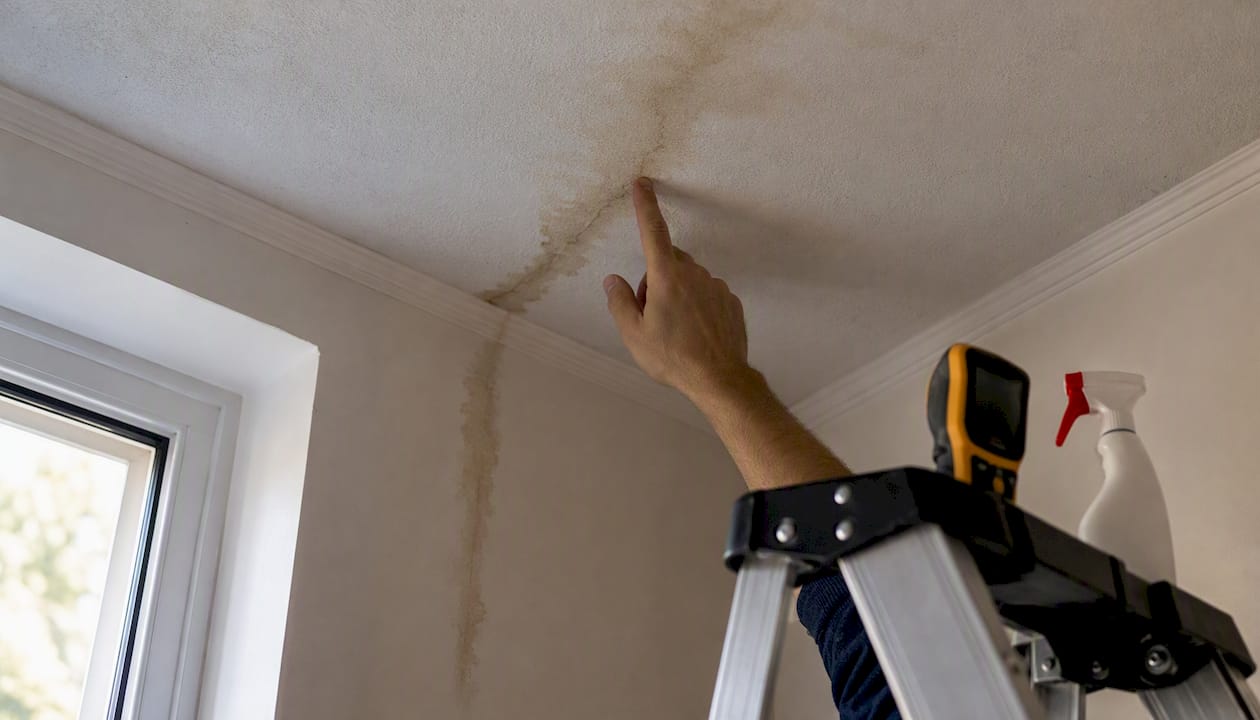
Roof leaks are the most common culprit in single-story homes and top-floor units. Look for stains near exterior walls, around chimneys, skylights, or dormers, and along the roofline after heavy rain. Damaged flashing and missing shingles are the usual entry points.
Plumbing leaks from upstairs bathrooms, kitchens, or laundry rooms tend to produce stains directly below those fixtures. A toilet wax ring failure, a slow drain connection drip, or a supply line pinhole can all create a persistent brown ring. A stain that expands specifically after someone uses an upstairs fixture is almost certainly plumbing-related, not a roof problem.
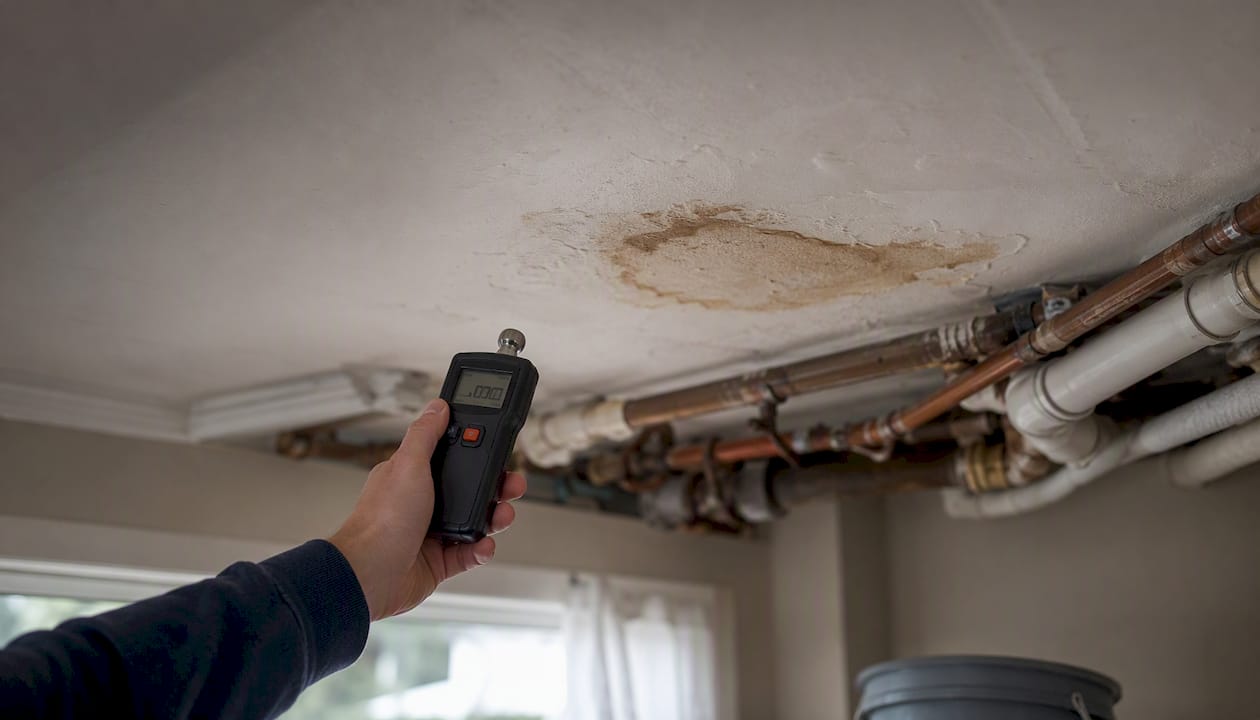
HVAC condensation and drip pans are a frequently misdiagnosed source. If the stain follows the path of ductwork or appears only during cooling months without any rain, the culprit is likely a clogged condensate drain line or an overflowing drip pan. The fix here is insulation and humidity control, not a roofer.
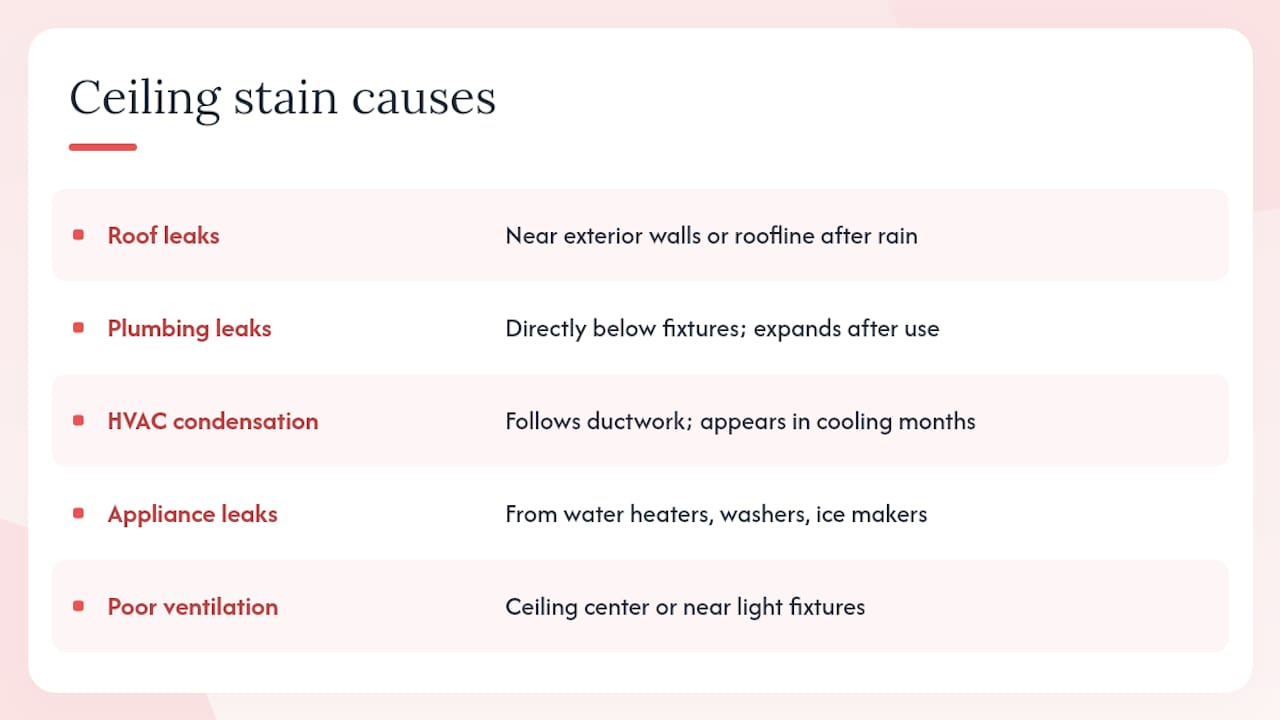
Appliance leaks from water heaters, washing machines, or refrigerator ice makers can drip through floor assemblies and show up on the ceiling below.
Poor ventilation and high indoor humidity cause condensation on cold surfaces. Bathrooms without exhaust fans are a classic example. The stain tends to appear at the ceiling center or near light fixtures and worsens in winter.
Once you know the likely category, you can call the right contractor and avoid paying a roofer to investigate what turns out to be a plumbing problem.
How serious is the stain, and when should you call a professional?
Minor cosmetic stains with dry, firm drywall are DIY territory. Everything else has a threshold, and crossing it means calling a professional is the safer and cheaper long-term choice.
Professional intervention is necessary when any of the following apply:
- The affected area exceeds 10 square feet
- Drywall is sagging, crumbling, or feels soft when pressed
- Visible mold is present, or a musty odor persists after the area has dried
- Structural joists show rot, warping, or dark staining
- Water has contacted any electrical fixture, wiring, or junction box
“Saturated drywall and trapped water in ceiling cavities significantly increase collapse risk. Professional drying equipment and structural assessment are required for larger water events — not just cosmetic repair.” — People First Restoration
Safety warning on electrical hazards: If water is pooling near a light fixture or ceiling fan, shut off power at the breaker immediately. Do not flip the light switch. Do not touch the fixture. Call an electrician before any other repair work proceeds.
Who to call for each scenario:
- Plumbing leak above: licensed plumber
- Roof-sourced stain: roofing contractor
- HVAC condensation or drip pan overflow: HVAC technician
- Large area, mold, or structural damage: water damage restoration specialist (look for IICRC-certified firms)
Minor cosmetic repairs are often DIY-capable, but visible sagging, soft drywall, or mold are clear signals to stop and call a pro.
Step-by-step DIY repair for small, dry stains
Before you pick up a brush, confirm two things: the leak source is fixed, and the stained area is completely dry. Give it at least 24–48 hours after the source is repaired and confirm dryness with a moisture meter. Priming over trapped moisture causes the stain to bleed back through within weeks.
-
Protect the floor and furniture. Lay drop cloths and move anything you cannot cover. Ceiling work drips.
-
Clean the stained area. Mix one part household bleach with three parts water. Apply with a sponge, let it sit for a few minutes, then rinse with clean water. This removes surface mildew and lightens discoloration, but it does not remove trapped moisture. Let the surface dry fully before the next step.
-
Sand and remove loose material. If the drywall paper has bubbled or the surface is flaking, sand it smooth with 120-grit sandpaper on a sanding block. Remove any loose tape at seams.
-
Repair broken seams if needed. If the taped seam between drywall sheets is damaged, remove the damaged tape completely, fill the gap with joint compound, apply new drywall tape, feather additional compound over it, let it dry, then sand smooth. This step is skippable if the drywall surface is intact.
-
Apply a stain-blocking primer. This is the step most DIYers skip, and it is the reason stains bleed back through ordinary ceiling paint. Standard ceiling paint allows tannin and mineral deposits to bleed through; only a dedicated stain blocker stops it. Apply one coat and let it dry per the manufacturer’s instructions.
-
Repaint the ceiling. Use a roller with a 3/8-inch or 1/2-inch nap for textured ceilings. For the best result, paint the entire ceiling rather than just the patched area. Spot painting almost always shows a sheen or color mismatch.
Pro Tip: Shellac-based primers like Zinsser BIN block the toughest stains and dry fast, but they require mineral spirits for cleanup and have a strong odor. Oil-based options like Zinsser Cover Stain or KILZ Original offer strong blocking with slightly easier cleanup. For lighter stains, a water-based stain blocker like KILZ 2 or KILZ Restoration works well and cleans up with soap and water. Match the primer to the severity of the stain, not just what is on the shelf.
For step-by-step ceiling painting guidance after the repair is complete, including surface preparation and application technique, that resource covers the finishing process in detail.
What materials and tools do you need?
Gather everything before you start. Stopping mid-repair to make a hardware store run wastes time and lets surfaces dry unevenly.
Tools:
- Sturdy ladder (rated for your weight plus materials)
- Flashlight and moisture meter for diagnostics
- Utility knife and putty knife
- Sanding block with 120-grit sandpaper
- Paint roller with extension pole and 3/8–1/2-inch nap cover
- Drop cloths and painter’s tape
- Bucket and sponge for cleaning
- Box fan or dehumidifier for drying
Materials:
- Stain-blocking primer: KILZ Original (oil-based), KILZ 2 or KILZ Restoration (water-based), Zinsser BIN (shellac-based), or Zinsser Cover Stain (oil-based)
- Household bleach for mildew cleaning
- Joint compound and drywall tape for seam repairs
- Ceiling paint matched to existing sheen
PPE:
- Respirator (N95 minimum for shellac or oil-based primers; the fumes are significant)
- Disposable nitrile gloves
- Safety glasses
For paint sealant options that add long-term surface protection after the repair, that guide covers application and product selection. Home Depot’s repair guide also covers both temporary containment steps and full repair paths, including when to replace wet drywall entirely.
How long does repair take, and what does it cost?
DIY timeline for a small, dry stain:
- Diagnose and confirm source fixed: 1–2 hours
- Dry the area: 24–72 hours (use a fan or dehumidifier to speed this up)
- Clean, sand, and prep: 1–2 hours
- Prime and paint: 1 day (primer coat, dry, paint coat)
- Total: roughly 2–5 days, most of which is waiting for things to dry
**Professional repair timeline for moderate or severe damage:
**
- Inspection and moisture mapping: same day
- Drying with professional equipment: 3–7 days
- Drywall repair and finishing: 1–5 days depending on scope
Ballpark cost ranges (materials and labor; excludes fixing the leak source):
-
DIY materials for a small stain: a moderate cost range typical for such projects
-
Minor professional repair (small area, no mold): a moderate cost range typical for such repairs
-
Moderate drywall replacement: a significant repair cost range typical for drywall replacement
-
Severe or structural damage: a high repair cost range typical for major ceiling damage
These ranges align with WaterDamageFinder’s cost guidance for ceiling repair after water leaks. Costs vary by region, ceiling height, and access difficulty. The leak source fix (roofing, plumbing, HVAC) is always a separate cost on top of these figures.
How do you prevent ceiling stains from coming back?
Prevention is mostly scheduled maintenance. Most ceiling water damage is not random. It follows neglected gutters, aging caulk, and skipped HVAC service.
Seasonal exterior checks:
- Inspect the roof and flashing twice a year, ideally in spring and fall
- Clean gutters and downspouts at least once a year, more often if you have nearby trees
- Check attic ventilation and insulation condition annually; wet or compressed insulation loses its effectiveness and holds moisture against the roof deck
Plumbing and mechanical maintenance:
- Inspect supply lines under bathroom and kitchen sinks every six months
- Check washing machine hoses for cracks or bulging annually and replace rubber hoses every five years
- Flush and inspect the water heater annually
- Clear the HVAC condensate drain line at the start of each cooling season and check the drip pan for standing water
Indoor humidity control:
- Run bathroom exhaust fans during and for 15 minutes after every shower
- Use kitchen range hoods when cooking
- Target indoor humidity between 30–50% per EPA guidance; a basic hygrometer costs under $15 and tells you where you stand
- Run a dehumidifier in basements or crawlspaces during humid months
Small fixes that prevent big problems:
- Recaulk around tub surrounds, shower bases, and toilet bases every few years
- Insulate cold water pipes and ducts in unconditioned spaces to prevent condensation
- Confirm attic exhaust fans vent to the exterior, not into the attic space itself
Pro Tip: Take 10 minutes each spring to walk your attic with a flashlight after the first heavy rain of the season. Fresh water stains on rafters or wet insulation tell you about a roof problem before it becomes a ceiling problem.
Professional tips, common mistakes, and evidence-based thresholds
The most common homeowner mistake is painting over a stain without fixing the source first. The stain returns within weeks, and the second repair costs more because the primer layer is now contaminated. The second most common mistake is trusting the stain’s visual location as the leak source. Water travels along framing and insulation, sometimes several feet, before dripping. Always trace upward and outward from the stain, not directly above it.
A third mistake: using standard ceiling paint as a stain blocker. It does not work. Tannins and mineral deposits in water-damaged drywall bleed through latex ceiling paint reliably. KILZ and Zinsser exist specifically to stop this bleed-through, and skipping them wastes the paint coat on top.
Professional diagnostics go further than a flashlight and a moisture meter. Infrared cameras detect temperature differentials that reveal wet areas behind intact drywall. Borescope inspection lets a technician see inside a wall cavity without cutting it open. Pressure testing isolates plumbing sections to confirm or rule out a supply line leak. These tools reduce the scope of demolition and often pay for themselves in avoided guesswork.
“The key professional thresholds are clear: an affected area over 10 square feet, sagging or crumbling drywall, visible mold, a persistent musty odor after drying, or joist rot all require professional remediation — not a DIY primer coat.” — WaterDamageFinder
For HVAC-sourced stains specifically, calling a roofer is a common and costly misdiagnosis. If the stain follows ductwork or appears only during cooling months, the fix is a condensate line cleaning and possibly better duct insulation. A roofing contractor cannot solve that problem.
5starpainting’s surface preparation standards reflect the same professional logic: no cosmetic finish holds without correct prep. Identifying the stain type, confirming the substrate is dry, and selecting the right primer are the steps that determine whether a ceiling repair lasts one year or ten.
Key Takeaways
Fixing a ceiling water stain correctly requires stopping the source, drying the substrate fully, and applying a stain-blocking primer before any paint touches the ceiling.
| Point | Details |
|---|---|
| Stop the source first | No repair holds if the leak is still active; fix plumbing, roofing, or HVAC before touching the stain. |
| Dry for at least 24–48 hours | Confirm dryness with a moisture meter before priming; trapped moisture causes the stain to bleed back through. |
| Use a stain-blocking primer | KILZ or Zinsser (shellac, oil, or water-based) is required; standard ceiling paint will not stop tannin bleed-through. |
| Know the professional thresholds | Areas over 10 sq ft, sagging drywall, visible mold, or joist rot require a certified professional, not a DIY fix. |
| 5starpainting for the finish | After source repair and drying, 5starpainting’s surface-prep and painting service delivers a lasting, professional ceiling finish. |
The part most guides skip
Most ceiling repair articles stop at “prime and paint.” What they understate is how much the finishing quality determines whether the repair is visible six months later.
Patch painting a ceiling almost always shows. The sheen of new paint over a primed spot rarely matches the surrounding aged ceiling, even when you use the same product. The correct approach is to prime the repair area, then roll the entire ceiling in one session. That single-session coat blends the sheen uniformly and eliminates the “halo” effect around the patch.
Texture matters too. If your ceiling has a light orange-peel or skip-trowel texture and the repair area was sanded smooth, the patch will be obvious under raking light. Matching texture before priming takes an extra 30 minutes and saves the frustration of a visible repair.
The other thing worth saying plainly: coordinate the source repair and the cosmetic repair as two separate, sequential jobs. Calling a painter before the plumber has confirmed the leak is fixed wastes money. The correct sequence is always source fix first, drying second, cosmetic repair third. 5starpainting’s project management approach, which assigns a dedicated project manager to each job, is built around exactly this kind of sequencing. Surface preparation, furniture protection, and a one-year warranty on the finish are part of every job.
Ready for a professional ceiling finish after your repair?
Once the leak is fixed and the ceiling is dry, the cosmetic repair is where quality shows. A patched ceiling that looks professionally finished requires the right primer, matched texture, and a full-ceiling paint coat applied by someone who has done it hundreds of times.

5starpainting brings over 30 years of surface preparation and painting expertise to every job, with all-inclusive fixed pricing that covers genuine Nippon Paint, furniture protection, and post-job cleanup. No hidden fees, no guessing on materials, and a one-year warranty on the finish. Whether you have an HDB flat or a condo unit that needs a ceiling repainted after water damage, the process starts with a quote.
Get a quote for your ceiling repair and let a dedicated project manager handle the finishing details from prep to final coat.
Useful sources
The following sources informed this guide and are worth bookmarking for further reference:
- Ceiling Repair After Water Leak: What to Do and What It Costs | WaterDamageFinder
- How to remove ceiling water stains (Southern Living / The Spruce excerpt)
- Water Stain on Ceiling: What Is Causing It and Who to Call | Dalmatian Plumbing
- How to Repair Ceiling Water Stains: A Step-by-Step Guide | WaterDamageRepair.tech
- Ceiling Water Damage: Common Causes and How to Handle It | People First Restoration
- How to Remove Ceiling Stains — Water Damage Repairs | Popular Mechanics
- How to repair a water-damaged ceiling | Home Depot
- Water Stains on Ceilings: Causes, Removal, and Prevention | Mr. Handyman