
Yes, you can paint over cement screed, but only if it’s fully cured, dry, and properly prepared. Skip any of those three conditions and you’re setting up the topcoat to peel, bubble, or flake within months. The right system is an alkali-resistant masonry primer followed by a breathable acrylic latex for walls, or an epoxy primer with an epoxy or polyurethane topcoat for floors. 5starpainting treats screed the same way any experienced painting crew does: as a protective coating job, not a cosmetic one.
Before you open a can of paint, run through this checklist:
- Wait it out. Give new screed a minimum of 28 days to cure, and longer for thick slabs or areas with poor ventilation.
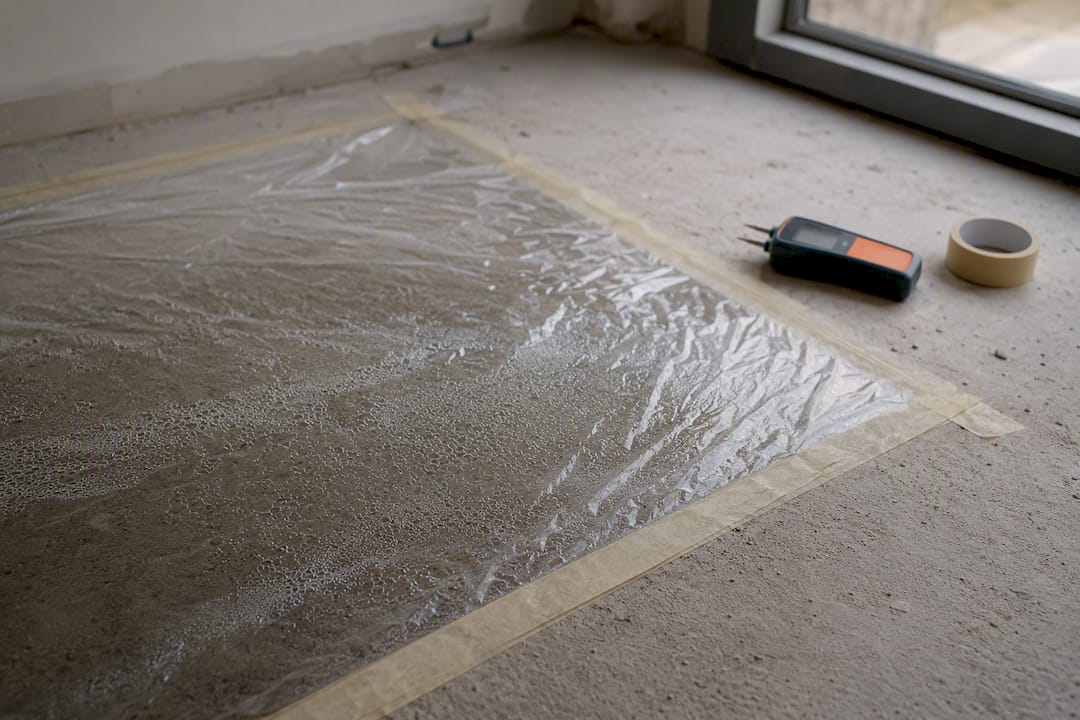
- Test for moisture. A plastic sheet taped down overnight tells you more than a calendar ever will.
- Remove laitance. That powdery film on the surface has to go before anything sticks.
- Prime correctly. An alkali-resistant primer on walls, an epoxy primer on floors. Skipping this step is the single most common cause of paint failure on screed.
Quick fact: Industrial floor coating standards call for a substrate compressive strength of at least 25 MPa and a pull-off strength of 1.5 MPa before a coating system is considered reliable under regular foot or wheel traffic.
Get those four things right and cement screed takes paint just as well as plaster or drywall. Get them wrong and you’ll be scraping failed coatings off within a year.
Key Takeaways
Cement screed takes paint reliably only when it’s cured, dry, and mechanically prepped before an alkali-resistant primer and matched topcoat go on.
| Point | Details |
|---|---|
| Wait before painting | Give screed at least 28 days to cure, and closer to six weeks for thicker slabs or humid rooms. |
| Test, don’t guess | Run the plastic sheet test overnight and check for laitance and efflorescence before priming. |
| Match primer to surface | Use an alkali-resistant masonry primer for walls and an epoxy primer for floors. |
| Choose the right topcoat | Breathable acrylic latex suits interior walls; epoxy or polyurethane suits floors under heavy use. |
| Know your limits | 5starpainting offers surface testing, matched Nippon Paint systems, and a one-year warranty for jobs beyond DIY scope. |
Table of Contents
- How Long Should You Wait Before Painting Cement Screed?
- What Should You Look for Before Painting the Screed?
- How Do You Prepare Screed for Paint Step by Step?
- Which Primer and Paint Work Best on Cement Screed?
- How Do You Apply Primer and Paint to Screed Correctly?
- Why Do Painted Screed Surfaces Peel or Blister Later?
- When Should You Hire a Professional Painter Instead?
- Getting a Professional Finish on Screed Without the Guesswork
- Get a Screed Surface Painted Right the First Time
- Where to Read More on Screed Prep and Coatings
- Frequently Asked Questions
- Sources
How Long Should You Wait Before Painting Cement Screed?
Most trade guidance points to a minimum of 28 days before painting standard concrete or screed, and that number assumes decent ventilation and average humidity. Thicker slabs, ground-floor pours, or screed laid over a damp-proof membrane that isn’t performing as expected can all push that timeline much further out. Some trades people recommend waiting around six weeks before painting or tiling new screed, and that’s a more realistic baseline for anyone working in a humid climate.
Calendar days only tell you part of the story. Screed dries from the surface down, which means it can feel dry to the touch while still holding significant moisture deeper in the slab. That trapped moisture has nowhere to go once you seal it under a coat of paint, so it pushes back against the coating from underneath. The result is blistering, peeling, or a hazy white bloom under the finish.
Run the plastic sheet test before you commit to painting:
- Tape a square of clear plastic sheeting, roughly 18 inches on each side, tightly to the screed so no air can get underneath.
- Leave it in place overnight, ideally for a full 24 hours.
- Peel it back and check for condensation on the underside of the plastic or a darker, damp patch on the screed itself.
- If either shows up, the screed isn’t ready. Wait another week or two and repeat the test.
- If the surface stays dry and the plastic stays clear, you’re clear to move on to surface prep.
For anything beyond a quick visual check, particularly on large floor areas or slabs where you suspect a failed damp-proof membrane, a moisture meter reading or a professional moisture survey is worth the cost. It beats repainting an entire floor six months later.
If you need the surface protected but aren’t ready to commit to a final finish, a diluted PVA coat gives cheap, temporary protection against dust and light foot traffic. It’s a reasonable stopgap if you’re planning to tile later, but don’t treat it as a substitute for a proper primer and topcoat system. PVA isn’t designed to handle the alkalinity or ongoing moisture movement in fresh screed long term.
Pro Tip: If you’re unsure whether your screed is ready, run the plastic sheet test in three different spots on the same floor. Moisture doesn’t dry evenly, and a reading near an exterior wall can look very different from one in the middle of the room.
What Should You Look for Before Painting the Screed?
Not every screed problem announces itself. Some surface issues are obvious the moment you walk into the room; others need a closer look before you commit to priming.
Laitance is the most common issue and the easiest to miss. It’s a thin, powdery layer of fine cement particles and water that rises to the surface as screed cures, and it looks almost identical to a light coat of dust. Run your palm across the surface. If it leaves a chalky residue on your skin, that’s laitance, and paint applied over it will bond to the loose powder rather than the screed underneath. Failing to remove laitance is one of the leading causes of early coating failure, because the bond looks fine on day one and lets go within weeks.
Efflorescence shows up as white, powdery salt deposits, often in patches or streaks. It’s a sign that moisture is moving through the screed and depositing dissolved salts as it evaporates at the surface. Brushing it off is a temporary fix at best. If efflorescence keeps returning after you’ve cleaned it, that’s a moisture problem, not a surface problem, and it needs to be resolved before you paint anything.
Contamination from oils, grease, or leftover curing compounds is harder to spot visually but just as damaging. A simple water test helps: splash a little water onto the screed. If it beads up instead of soaking in, there’s likely an oily residue or a curing agent still sitting on the surface, and it needs to be stripped with a degreaser before you go any further.
Structural issues are the ones that need a professional opinion. Tap the surface with a hard object, like the handle of a screwdriver, and listen for a hollow sound. That often signals delamination, where the screed has separated from the base slab underneath. Cracks wider than a hairline, or ones that run through the full depth of the screed rather than just the surface, also fall outside DIY territory. Painting over structural damage doesn’t fix it. It just hides it until the coating fails and the underlying problem is worse than before.
A quick pull-off test, pressing a strip of duct tape firmly onto the screed and yanking it off, gives you a rough sense of surface soundness. If it pulls away chunks of screed rather than just dust, the surface needs more prep work before priming.
How Do You Prepare Screed for Paint Step by Step?
Preparation is where most paint jobs on screed succeed or fail, and it takes longer than most DIYers expect. Budget more time for this stage than for the actual painting.
Step 1: Clean and degrease.
Sweep the surface thoroughly, then wash it with a mild detergent solution or a dedicated concrete cleaner if you’ve identified oil or grease contamination. Scrub with a stiff-bristle brush, working in sections so the cleaner doesn’t dry before you rinse it. Rinse with clean water and let the surface dry completely, which usually takes at least 24 hours indoors with decent airflow.
Step 2: Remove laitance and profile the surface.
Light sanding with coarse sandpaper or a floor sander works for walls and smaller floor areas. For larger floors, a diamond grinder gives a faster, more even result and opens up the surface pores so primer can actually penetrate rather than sit on top. Acid etching, using a diluted muriatic acid solution, is another option for floors, but it demands careful handling, full rinsing to neutralize the acid, and solid ventilation. If you’re not confident managing acid safely, mechanical sanding or grinding is the safer DIY route.
Step 3: Vacuum and inspect.
Once you’ve sanded, ground, or etched the surface, vacuum up all dust and debris. A shop vac with a fine filter works better than a broom, which tends to just redistribute dust into the air and back onto the surface.
Step 4: Repair cracks and joints.
Hairline cracks can usually be filled with a flexible acrylic or polyurethane crack filler, applied with a caulking gun and smoothed with a putty knife. Wider structural cracks need hydraulic cement, which expands slightly as it cures and locks into the crack rather than just sitting on top of it. Movement joints, the deliberate gaps left in large screed floors to accommodate expansion, should be filled with a flexible sealant rather than a rigid filler. A rigid filler in a movement joint will crack again the first time the slab shifts with temperature changes.
Step 5: Let repairs cure before priming.
Hydraulic cement typically needs at least 24 to 48 hours before you can prime over it, and flexible fillers need to fully skin over, which can take longer in humid conditions. Check the product’s technical data sheet for the exact window. Priming over a repair that hasn’t cured traps moisture in exactly the spot you just fixed.
Safety gear matters at every stage. Sanding and grinding kick up fine silica dust, which is a genuine respiratory hazard, so wear a properly rated dust mask or respirator, not just a cloth covering. Safety glasses and gloves are non-negotiable if you’re working with acid etching solutions or hydraulic cement, both of which can burn skin on contact. Good ventilation isn’t optional either, especially in enclosed rooms or garages.
Pro Tip: Test your degreaser and any acid etching product on a small, hidden section of screed first. Some cleaners react unpredictably with certain screed additives, and you’ll want to know that before you’ve covered the whole floor.
Which Primer and Paint Work Best on Cement Screed?
The primer you choose matters more than the topcoat, because it’s the layer doing the actual bonding to a surface that’s naturally alkaline and porous.
For walls, an alkali-resistant masonry primer is the standard choice. Fresh cement-based screed can carry a pH as high as 12 to 13, which is alkaline enough to break down ordinary latex paint from underneath before it’s even had a chance to cure properly. An alkali-resistant primer creates a barrier that lets the topcoat bond without reacting to that chemistry. For floors, an epoxy primer does the same job, but with the added benefit of better mechanical adhesion under the higher wear that floors experience.
Once the primer’s down, the topcoat choice depends on where you’re painting:
- Interior walls: A breathable acrylic latex paint is the right call. Screed and concrete are porous materials that continue releasing small amounts of moisture vapor long after they’re technically “dry.” A breathable topcoat lets that vapor escape gradually instead of trapping it behind an impermeable film.
- Garage and utility floors: Epoxy coatings give the durability and chemical resistance that high-traffic or oil-exposed floors need. They’re harder and more resistant to abrasion than acrylic systems, which matters if you’re parking a car or rolling equipment across the surface.
- Floors needing more flexibility: Polyurethane topcoats handle minor substrate movement better than epoxy and often hold up better to UV exposure, which matters for any screed floor near windows or in a partially covered outdoor space.
Quick fact: Manufacturer guidance for most concrete and masonry primers puts the ideal application window at roughly 50–90°F (10–32°C), with performance dropping off sharply outside that range. Cold application slows curing and weakens the bond; excessive heat can cause the primer to skin over too fast for proper adhesion.
Always check the technical data sheet for the specific products you’re using. Primer and topcoat manufacturers design their systems to work together, and mixing brands or product families across primer and topcoat can void the alkali resistance or breathability the system was built around. Manufacturer guidance consistently recommends staying within a matched product family for exactly this reason. If you’re set on a specific paint brand for the topcoat, confirm the same manufacturer makes a compatible primer before you buy either one.
How Do You Apply Primer and Paint to Screed Correctly?
Application technique on screed follows the same logic as any other surface, cut in first, then fill in the larger area, but the coat counts and cure windows run longer than a standard drywall job.
- Cut in the edges first. Use a quality angled brush to paint a clean line around the perimeter, baseboards, or wall junctions before rolling the main area. This keeps you from rushing the edges later with a roller.
- Apply the primer in one even coat. For walls, use a medium-nap roller (around ⅜ to ½ inch) to work primer into the surface texture without leaving heavy ridges. For floors, a longer nap roller or a squeegee-and-roller combination handles the coarser texture of screed better than a short-nap roller designed for smooth drywall.
- Let the primer dry fully before recoating. Most alkali-resistant and epoxy primers need 4 to 24 hours before the next coat, depending on temperature and humidity. Check the data sheet rather than guessing.
- Apply the first topcoat. Follow the stepwise sequence most contractors use: primer, then topcoat, allowing full cure before heavy use. A single coat rarely gives even coverage or long-term durability, so plan for two.
- Apply a second topcoat once the first has dried to the touch. This typically takes 4 to 8 hours for acrylic latex and can extend to 24 hours for epoxy, depending on ambient temperature.
- Respect the difference between dry-to-touch and fully cured. Dry-to-touch might happen within a day, but that’s not the same as chemical cure. Epoxy and polyurethane systems often need 5 to 7 days to reach full chemical cure, even though they feel solid within 24 hours.
Light foot traffic is usually fine after 24 hours for acrylic wall paint and after 48 to 72 hours for epoxy floor systems. Heavy loads, furniture, appliances, vehicle traffic, should wait for full cure, which for many epoxy and polyurethane products means five days minimum. Rushing this step is one of the most common regrets DIYers report, because the coating looks finished long before it’s actually hardened all the way through.
Sprayers can speed up large floor jobs, but they demand more masking and cleanup than most homeowners want to deal with for a single project. A roller and brush combination gives you more control for a first attempt, especially around edges and in smaller rooms.
Pro Tip: Keep a written log of when you applied each coat and at what temperature. If a problem shows up weeks later, that record helps you (or a professional) figure out whether timing or conditions were the likely cause.
Why Do Painted Screed Surfaces Peel or Blister Later?
Most coating failures on screed trace back to one of three causes: moisture, salts, or rushed prep.
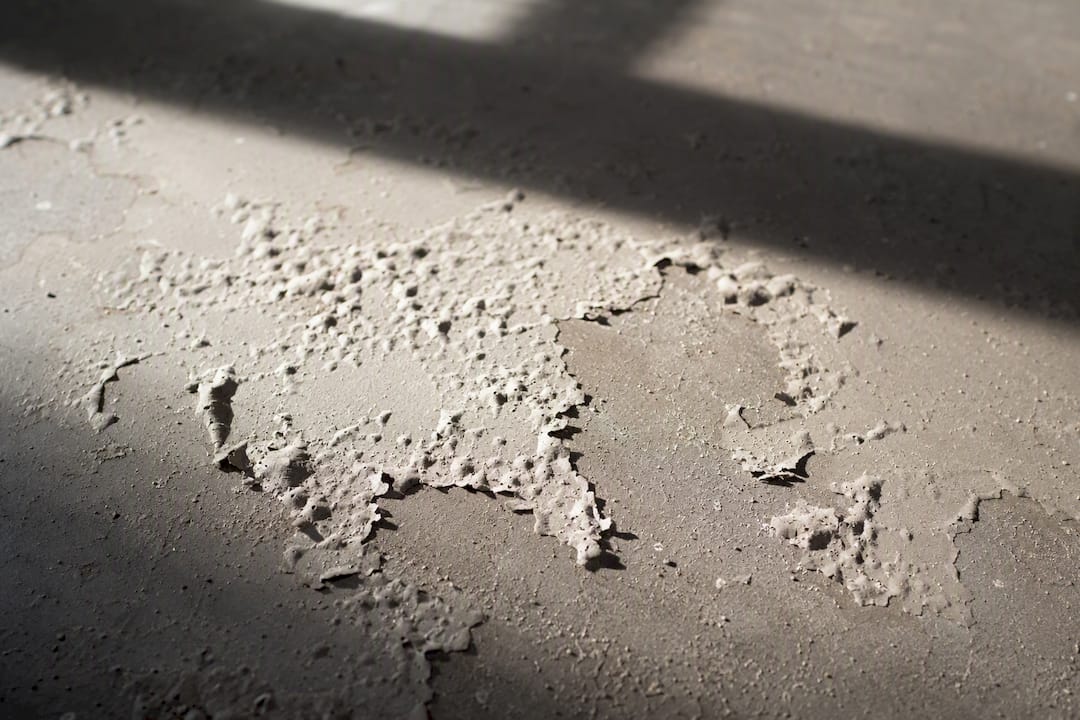
Moisture-driven failure shows up as bubbling or blistering, often months after the job looked perfect. It happens when the screed wasn’t fully cured before painting, and vapor trapped underneath eventually pushes the coating away from the surface. The fix almost always means stripping the affected area back to bare screed, confirming moisture levels with a proper test, and starting the prep process over.
Efflorescence-related failure looks like flaking paint with a white, gritty residue underneath. Salts dissolved in the screed’s moisture crystallize at the surface and physically push the coating off from below. Cleaning the salts away and re-testing for ongoing moisture before repainting is the only real fix; painting straight back over it just delays the same problem.
Poor adhesion from inadequate prep tends to show up as peeling in sheets, particularly in corners or high-wear areas, rather than isolated bubbles. This is usually a leftover laitance layer or a skipped primer coming back to bite you.
For any of these, here’s the general repair approach:
- Mechanically remove the failed coating with a scraper, sander, or grinder, going back to sound screed.
- Re-test for moisture and laitance before assuming the surface is ready.
- Spot-prime the repaired area and blend the recoat into the surrounding finish.
- If failure covers more than a small patch, treat it as a full system redo rather than a spot fix.
Once the coating is sound, maintenance is straightforward. Clean painted screed with a mild detergent and warm water rather than harsh solvents, which can break down epoxy and acrylic finishes over time; for detailed care tips, see how to make wood floors shine for related maintenance advice on resilient surfaces like floors How to Make Wood Floors Shine — Royal Carpet Cleaning. Gentle, regular cleaning extends the life of the finish far more than any specialty product. Inspect painted floors and walls every few months for early signs of lifting or discoloration, since catching a small problem early is always cheaper than redoing an entire surface.
Pro Tip: If you spot a small bubble or blister forming, don’t just paint over it. Pop it, check what’s underneath (moisture, dust, or a clean surface), and you’ll know immediately whether you’re dealing with a quick spot fix or a bigger moisture issue.
When Should You Hire a Professional Painter Instead?
Some screed problems are worth handling yourself. Others aren’t, and knowing the difference saves you from a costly redo.
Call in a professional if you’re dealing with persistent moisture that keeps returning after multiple tests, a large floor area where an uneven epoxy application would be obvious and expensive to fix, or any sign of structural delamination that goes beyond surface-level cracking. Large-scale floor coating work also benefits from professional-grade equipment, like floor grinders and moisture meters, that most homeowners don’t own and wouldn’t want to buy for a single job.
5starpainting has spent over 30 years handling exactly these situations across HDB flats, condos, and landed properties. Every job starts with a proper surface assessment rather than a quick coat of paint over whatever’s there, and every project gets a dedicated project manager who oversees the work from prep through final cleanup. Jobs use genuine Nippon Paint products, matched primer and topcoat systems rather than mismatched brands, and the pricing is all-inclusive, covering labor, materials, furniture protection, and cleanup with no hidden add-ons. Every completed job comes with a one-year warranty.
If you’re vetting any contractor for a screed painting job, ask these questions before signing anything:
- Will they test the surface for moisture and laitance before quoting a final price?
- Can they explain their primer and topcoat system, and why it matches your specific surface?
- Is the pricing genuinely all-inclusive, or are prep, materials, and cleanup billed separately?
- Do they offer a warranty on the finished work?
A vague answer to any of those questions, or a contractor who skips straight to a price without mentioning surface testing, is a red flag worth taking seriously.
Pro Tip: Ask any contractor what they’ll do if they find moisture or laitance during prep, before the job starts. A contractor who has a clear answer, rather than a shrug, is the one who’s actually done this before.
Getting a Professional Finish on Screed Without the Guesswork
The research here points to one clear conclusion: screed painting fails far more often from rushed prep and ignored moisture than from choosing the wrong paint color. Most DIY guides spend their time on which primer to buy and barely mention the plastic sheet test or the pull-off check, yet those two things predict success better than any product label does. That gap in the conventional advice is exactly where most repaint jobs originate.
If there’s one habit worth adopting, it’s treating every screed job as a moisture investigation first and a painting job second. A surface that looks dry rarely tells you the whole story, and the cost of one extra week of testing is nothing compared to redoing an entire floor. Homeowners who skip straight to primer because the screed “feels ready” are the ones who call a painter back six months later asking why the finish is bubbling.
DIY prep work has real limits, particularly on large floors or anywhere moisture keeps returning. Knowing when to stop testing and start calling a professional is its own kind of expertise.
Get a Screed Surface Painted Right the First Time
Testing your own screed for moisture and laitance takes time, and even careful DIY prep can miss a structural issue that only shows up months later. 5starpainting handles that risk for you, starting every HDB, condo, or landed property job with a real surface assessment rather than a guess, then applying genuine Nippon Paint through a matched primer and topcoat system built for the surface you actually have.

Every job comes with all-inclusive pricing covering labor, materials, furniture protection, and cleanup, plus a personal project manager who tracks the work from prep through final coat. You also get a one-year warranty, so if anything does surface after the job wraps, it’s covered rather than becoming your problem to fix. If your screed floor or wall needs more than a weekend’s worth of DIY prep, or you’d simply rather not gamble on a first attempt, get a quote through the HDB painting services page or check the condo painting packages for higher-rise properties. A quick call gets your surface assessed properly before a single drop of paint goes on.
Where to Read More on Screed Prep and Coatings
For readers who want to dig deeper into product specifics or substrate standards, these references cover the technical detail behind the guidance above:
- Concrete Floor Surface Preparation & Cleaning Guide for compressive and pull-off strength standards.
- Sherwin-Williams’ concrete painting guide for manufacturer-level primer and topcoat pairing advice.
- Floor Screeding Contractors’ step-by-step guide for a practical application sequence.
- PWM Sales on painting screed floors for a general overview of suitable systems.
Always check the technical data sheet for the specific primer and paint you buy. Formulations vary between manufacturers, and the exact cure times and application windows on the label take priority over any general guidance.
Frequently Asked Questions
Can you paint over cement screed without a primer?
Skipping primer is one of the fastest ways to see a topcoat fail. Screed’s natural alkalinity breaks down ordinary paint from underneath, and an alkali-resistant primer is what protects the topcoat from that chemical reaction.
How long does cement screed need to cure before painting?
Plan for a minimum of 28 days for standard screed, and closer to six weeks for thicker floors or poorly ventilated rooms. A moisture test matters more than the calendar, since drying time varies with slab thickness and humidity.
What is the best paint for cement screed floors?
Epoxy and polyurethane systems hold up best on floors because they resist abrasion and chemical exposure far better than standard wall paint. Epoxy suits high-traffic or oil-exposed areas like garages, while polyurethane handles minor movement and UV exposure better.
Why is my paint peeling off cement screed?
Peeling usually traces back to moisture trapped under the coating, leftover laitance that was never removed, or a missing primer. Identifying which one caused the failure determines whether you need a moisture test, a mechanical strip-back, or a full recoat.
Can I paint cement screed walls with regular wall paint?
Regular latex paint without an alkali-resistant primer underneath tends to fail on fresh screed. Once you’ve applied the right primer, a breathable acrylic latex topcoat works well and allows any residual moisture vapor to escape gradually.
Sources
- Can you paint a screed floor? — PWM Sales
- Concrete Floor Surface Preparation & Cleaning Guide — BuyFloorPaint
- How to Paint Floor Screed — Floor Screeding Contractors
- What do I paint my new screeded floor with to protect it until we can afford to tile it — MyBuilder Q&A
- How to paint concrete — Sherwin-Williams project center